
Desserts
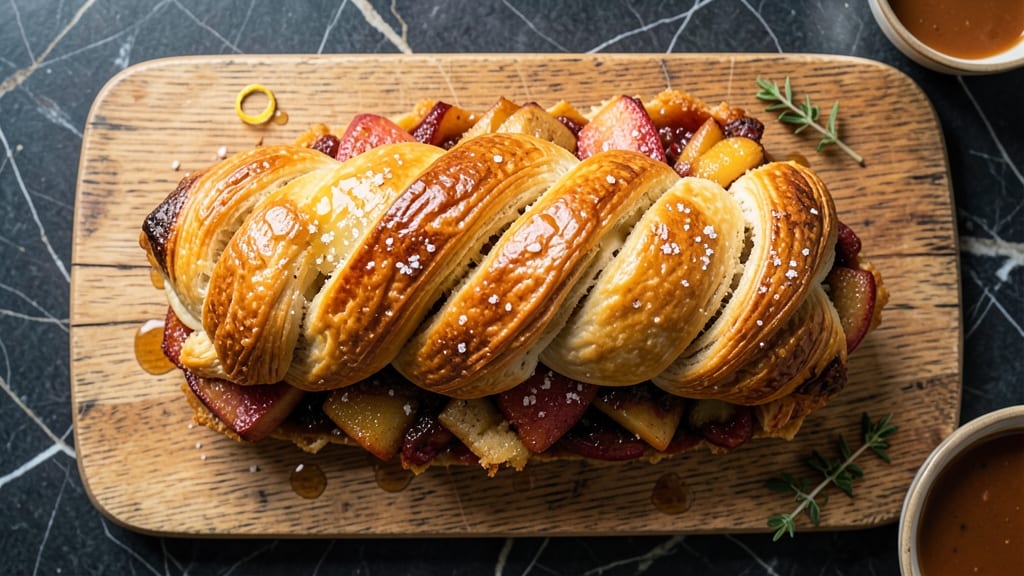
This apple pie braid recipe delivers the perfect balance of flaky, golden layers and caramelized apple filling that tastes like autumn in every bite. The secret lies in a simple yet foolproof dough that creates those signature braided layers, while a warm spice blend transforms ordinary apples into something extraordinary.
I've perfected this technique over years of baking, ensuring the crust stays crisp while the filling remains tender and fragrant.
The magic happens in the assembly—folding the dough into a classic braid that creates beautiful, even layers when baked. A touch of cinnamon and nutmeg in the filling elevates the apples to restaurant-quality depth, while a light cornstarch coating prevents sogginess.
This recipe builds on traditional methods but simplifies them for home bakers, so you get professional results without the complexity.
By the time it emerges from the oven, you'll have a showstopping dessert with crisp, buttery layers and a filling that's perfectly caramelized at the edges. The aroma alone will have everyone gathering around your table, and each slice reveals that perfect contrast between tender fruit and flaky crust.
It's the kind of dessert that feels special enough for holidays but simple enough for a weeknight treat.
Serve warm with vanilla ice cream or whipped cream for the full experience, or store at room temperature for up to 3 days. The flavors actually improve as it sits, making this the ideal make-ahead dessert for gatherings. Let's get baking!
Ingredients for apple pie braid
Six ingredients for the dough, seven for the filling—nothing fancy, just perfect flaky layers and caramelized apples.
| Ingredient | Amount | Notes |
|---|---|---|
| All-Purpose Flour 🌾 | 4 cups | Sifted for light texture |
| Unsalted Butter 🧈 | 1 cup | Cold and cubed |
| Granulated Sugar 🍚 | ½ cup | For dough sweetness |
| Ice Water 💧 | ½ cup | Chilled for dough binding |
| Salt 🧂 | ½ tsp | Fine sea salt preferred |
| Granulated Sugar 🍚 | 1 ½ cups | For filling sweetness |
| Ground Cinnamon 🌿 | 2 tsp | Freshly ground preferred |
| Ground Nutmeg 🌿 | ½ tsp | Freshly grated nutmeg |
| Cornstarch 🥔 | 2 tbsp | Prevents soggy crust |
| Apples 🍎 | 6 medium | Peeled and thinly sliced |
| Lemon Juice 🍋 | 1 tbsp | Freshly squeezed |
| Vanilla Extract 🥄 | ½ tsp | Pure vanilla preferred |
| Egg 🥚 | 1 large | For egg wash |
| Coarse Sugar 🍚 | 2 tbsp | For topping |
The butter here is non-negotiable—European-style butter like Plugrá or Kerrygold has more fat, which gives you that signature flakiness. If you can't find it, Land O'Lakes unsalted works in a pinch, but chill it first. The apples? Granny Smith or Honeycrisp hold their shape best—avoid anything too mealy. I like to peel them (the skin can get bitter when baked), but if you're feeling lazy, leave it on. Just make sure they're all the same size so they cook evenly.
No vanilla extract? Vanilla bean paste works great, or even a scraped vanilla bean if you're feeling fancy. Short on cinnamon? Cinnamon sticks crushed work too, but ground is easier. The cornstarch is key for that tender filling—don't skip it. If you're making this ahead, toss the sliced apples with a little lemon juice right away to keep them from browning. And for the love of pie, use cold butter for the dough. Cut it into tiny cubes and mix it in with your fingers—this is what makes it flaky, not a food processor.
This keeps beautifully for 3-4 days at room temperature, wrapped in foil. If you're making it ahead, assemble the braid and refrigerate overnight—it actually tastes better the next day. To reheat, warm at 350°F for 10-15 minutes until golden. The filling gets even more caramelized, so don't be afraid to let it sit a little longer. Store leftovers in an airtight container, but honestly? It won't last that long.
Why You'll Love This Recipe
- No-Fuss Dough: I swear by this ice water trick—it keeps the butter from turning into soup while kneading. The dough comes together faster than you can say "pie night," and it’s forgiving if I overwork it (which I do).
- Sweet Butter Magic: That flaky, golden crust with the caramelized sugar? It’s the star. The butter layers melt into little pockets of richness, and the sugar gives it this irresistible crunch—like biting into a hug from a bakery.
- Weeknight Crowd-Pleaser: I make this for book club, potlucks, or just because I’m tired of sad sandwiches. It’s big enough to share but small enough to bake on a weeknight, and everyone asks for seconds (even the gluten-free folks—it’s that good).
- Leftovers? More Like Leftovers: Honestly, I rarely have any. But if I do? The next day’s slices are even better—crispier edges, softer center, and that buttery aroma hits you before you even take a bite. (Yes, I eat it cold with coffee.)
Step-by-step instructions for apple pie braid
Here's how to create that perfect golden braid with tender apples and flaky layers.
Make the Dough for Flaky Layers
In a large bowl, combine the 4 cups all-purpose flour and 0.5 tsp salt. Cut in the 1 cup cold cubed unsalted butter using a pastry cutter or your fingers until the mixture resembles coarse crumbs with pea-sized butter pieces. This texture is key for flaky layers.
Add the 0.5 cup granulated sugar and mix until just combined. Then pour in the 0.5 cup ice water all at once and stir gently with a fork until the dough comes together. It'll be sticky—don't overwork it. Shape into a disk, wrap in plastic, and chill for 30 minutes. This resting time relaxes the gluten for perfect layers later.
Prepare the Apple Filling
Peel and thinly slice the 6 medium apples (about 1/8-inch thick). Toss them in a large bowl with the 1.5 cups granulated sugar, 2 tsp ground cinnamon, 0.5 tsp ground nutmeg, 2 tbsp cornstarch, 1 tbsp lemon juice, and 0.5 tsp vanilla extract. Let this sit for 10 minutes—this helps the apples release moisture and develop flavor.
After resting, squeeze out any excess liquid with your hands (you want just enough moisture to keep things sticky but not soupy). This step prevents a soggy crust. The filling should be glossy but not wet when you press it.
Assemble the Braid
Preheat your oven to 375°F. On a lightly floured surface, roll out the chilled dough into a 12x18-inch rectangle (about 1/8-inch thick). Spread the apple filling evenly over the dough, leaving a 1-inch border around the edges. This border prevents filling from oozing out during baking.
Starting from one of the long sides, roll the dough tightly into a log. Using a sharp knife, make 3 diagonal cuts (about 1/2-inch deep) every 4 inches along the log. This creates the classic braid pattern. Gently pull the cuts apart to form the braid shape, then tuck the ends under the log to seal.
Bake to Golden Perfection
Place the braid on a parchment-lined baking sheet. Brush the top with the 1 large egg beaten with 1 tbsp water for shine, then sprinkle with 2 tbsp coarse sugar. Bake for 40-45 minutes until the braid is deep golden brown and the filling is bubbling at the edges.
Rest and Serve
Let the braid cool on the baking sheet for 10 minutes—this helps set the layers. Then transfer to a wire rack. The crust will be crisp, the apples tender with just the right caramelization, and the layers will pull apart beautifully. Serve warm with vanilla ice cream for the ultimate experience.
Pro Tips For Making Apple Pie Braid
- CHILL THE DOUGH: After mixing your butter and flour for the braid dough, wrap it tightly in plastic and refrigerate for at least 30 minutes—yes, even if it looks perfect. I learned this the hard way when my first attempt puffed up unevenly in the oven because the butter was too warm. Cold dough handles better when shaping and bakes more evenly.
- USE ICE WATER: When mixing the dough, add ice water one tablespoon at a time instead of room-temperature water. The cold water keeps the butter from melting too soon, which means your braid will hold its shape better during baking. (And no, you don’t need to thaw the ice—just toss it in.)
- AVOID OVERHANDLING: Once you’ve shaped the braid, resist the urge to adjust it after it goes into the oven. Every time you tweak it, you’re weakening the structure, and that’s how you end up with a collapsed mess. Trust your initial shaping—it’s more stable than you think.
- CUT BUTTER IN SMALL PIECES: For the best texture, cut your cold unsalted butter into tiny, pea-sized pieces before mixing it into the flour. This ensures even distribution and prevents pockets of melted butter that can make your braid dense. (I used to eyeball it and ended up with butter clumps—don’t make my mistake.)
Creative variations of this dish
Autumn Spice Twist
Swap the classic cinnamon for a warm spice blend of 1 tsp cinnamon, ½ tsp cardamom, and ¼ tsp clove. This Middle Eastern-inspired twist adds depth while keeping the familiar apple flavor.
I like to toast the spices in a dry pan for 30 seconds before mixing them into the filling to intensify their aroma. 🌿
Nutty Caramel Filling
Add ½ cup chopped walnuts or pecans to the filling for crunch and richness. Toast the nuts in a dry skillet until fragrant, then fold them into the apple mixture.
For extra decadence, stir in 2 tbsp brown sugar and 1 tbsp maple syrup>—this creates a sticky caramelized filling that contrasts beautifully with the flaky crust.
Vegan Dough Option
Replace the butter with ½ cup vegan butter> (like Miyoko's) and use ¼ cup plant-based milk> (almond or oat) instead of ice water. The dough will still be tender, though slightly less flaky.
Brush the baked braid with 2 tbsp melted coconut oil> mixed with 1 tsp maple syrup> for a golden finish. This version is just as delicious and perfect for dietary restrictions.
Chocolate-Dipped Braid
After baking, let the braid cool slightly, then dip one-third of it into ½ cup melted dark chocolate> (about 60% cocoa). Place it on parchment paper and sprinkle with crushed hazelnuts> or sea salt> before the chocolate sets.
This adds a sophisticated twist that pairs perfectly with vanilla ice cream or whipped cream. The contrast of sweet, salty, and chocolate is pure magic. 🍫
Mini Braid Bites
Cut the dough into 4 equal rectangles> (about 6x9 inches>) and repeat the filling and braiding process for each. Bake at 375°F for 25-30 minutes> until golden.
These individual-sized braids are perfect for parties or potlucks—everyone gets their own mini dessert without the fuss. Plus, they reheat beautifully for seconds! 🍴
Seasonal Fruit Swaps
In summer, replace apples with peaches or pears>—toss them with 1 tsp lemon zest> and ½ tsp ginger> for a tropical twist. For winter, try cranberries> mixed with orange zest> and 1 tsp cinnamon>.
Each variation keeps the braid's signature layers while adapting to seasonal flavors. The key is always to pre-cook the fruit slightly to release moisture before assembling.
Nutrition facts
Frequently asked questions
Can I make this apple braid without a food processor?
The dough only needs your fingers to cut in the cold butter until it resembles coarse crumbs. This method creates perfect flaky layers—just work quickly and don't overmix. The key is keeping everything cold and using a pastry cutter or two forks if you prefer.
Why did my braid fall apart when cutting? This usually happens if the dough wasn't chilled long enough (at least 30 minutes) or if the filling was too wet. The crust needs to be firm to hold the braid shape. Next time, squeeze excess moisture from the apples and
Can I use a different type of apple?
Yes! While Granny Smith or Honeycrisp work best, you can try Braeburn or Fuji for a sweeter flavor. Just avoid mealy varieties like Gala—they won't hold up as well. For extra caramelization, toss the apples with 1 tsp lemon juice before baking to prevent browning while prepping.
How do I store leftovers?
Keep the braid in an airtight container at room temperature for up to 3 days. For longer storage, wrap tightly in plastic and freeze for up to 2 months. Reheat slices at 350°F for 5-10 minutes until warm—this helps restore the crispness of the layers.
What's the secret to extra-flaky layers?
Cold butter is non-negotiable—cut it into small cubes and mix it in with your fingers until it's pea-sized. Also, don't overwork the dough when combining the flour and water. The resting time (30 minutes) is crucial too—it helps the gluten relax for that signature flakiness.