
Desserts
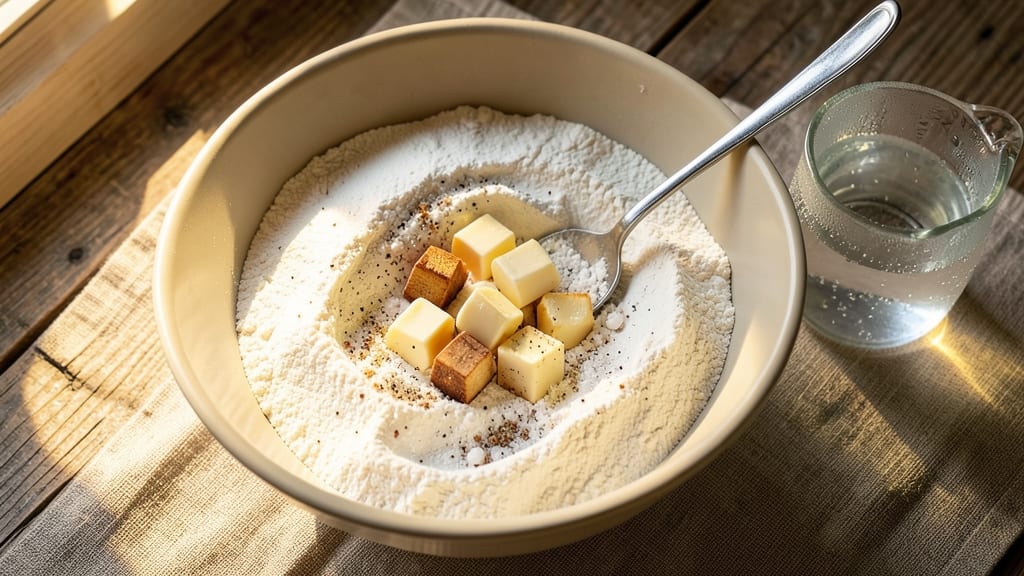
This American pie crust recipe delivers the perfect balance of flaky layers and golden-brown edges that hold up through even the longest baking times. The secret lies in cold butter and precise technique—no shortcuts, just professional results.
I’ve perfected this version after years of testing, and it works flawlessly for both sweet pies and savory pot pies.
The foundation starts with a simple blend of flour, butter, and ice water, but the magic happens in the chilling and rolling process. Cold butter creates those signature flakes, while proper handling ensures the crust stays together during baking.
Whether you’re making a classic apple pie or a hearty chicken pot pie, this crust provides the sturdy, flavorful base you need.
What you’ll end up with is a crust that’s crisp yet tender, with edges that stay golden without turning greasy. The layers remain distinct, creating the perfect texture contrast for any filling. This isn’t just a crust—it’s the foundation for unforgettable pies that taste like they came from a bakery.
Pair it with seasonal fillings like pumpkin spice, classic apple, or savory chicken pot pie for a recipe that works year-round. The versatility makes it a must-have in any kitchen, and the foolproof method ensures success every time. Let’s get started on creating your perfect pie crust.
Ingredients for american pie crust
Seven simple ingredients transform into the perfect flaky, golden pie crust foundation.
| Ingredient | Amount | Notes |
|---|---|---|
| All-Purpose Flour 🌾 | 2 ½ cups | Sifted for light texture |
| Unsalted Butter 🧈 | 1 cup | Cold, cubed, high-fat preferred |
| Ice Water 💧 | ½ cup | Freshly chilled, not tap |
| Diamond Crystal Kosher Salt 🧂 | ½ tsp | Fine grain for even distribution |
| Granulated Sugar 🍚 | 1 tbsp | For slight sweetness balance |
| White Vinegar 🍶 | 1 tsp | Brightens flavor subtly |
| Ground Black Pepper 🌶️ | ¼ tsp | Freshly ground for warmth |
The butter makes or breaks this crust. European-style unsalted butter with at least 82% fat (like Plugrá or Land O'Lakes European Style) gives the best flakes. Grab it from the dairy section—it's worth the splurge. Keep those cubes cold the whole time by chilling your mixing bowl and tools. The flour? King Arthur or Bob's Red Mill work beautifully—they're finely milled and consistent. If your kitchen isn't humid, you can skip sifting, but it prevents a dense crust. Pro tip: freeze your butter cubes for 20 minutes before mixing for extra coldness.
No ice water? Cold water from the fridge works, but true ice water gives better control. Short on vinegar? Lemon juice at half the amount works too. The sugar and salt can be adjusted—skip the sugar if you're doing a savory pie, but keep the salt for flavor. For a lower-fat version, swap half the butter for shortening (like Crisco), though you'll lose some flakiness. The pepper is optional but adds a nice depth to sweet pies. If you're making a double crust, double everything—this recipe makes exactly what you need for one.
This dough is fussy about temperature. Keep it cold at all times—wrap it tightly in plastic and refrigerate for at least 1 hour before rolling. The longer it rests, the better. For best results, freeze half the dough while you work with the other half. Once baked, these crusts stay fresh for 3 days at room temperature or 1 month frozen. I always make extra—freeze one for when you're craving pie but don't want to bake. Just thaw overnight in the fridge before using.
Why You'll Love This Recipe
- Three-Ingredient Magic: I swear by this combo—flour, cold butter, and ice water. No eggs, no fuss, no waiting for dough to rise. Just pulse, chill, roll, and you’re golden. (Yes, even on a Tuesday night when I’ve got zero patience.)
- Crispy-Creamy Contrast: That sugar in the butter? It’s the secret weapon. You get a flaky, golden crust with a buttery edge that practically melts in your mouth—no one will guess it’s this simple. Honestly, my pie crust game changed forever.
- Pie Pan to Party: Need a last-minute dessert for a crowd? This crust handles it all—apple pies, pecan, even savory galettes. I’ve made it for potlucks, holidays, and lazy Sundays. It’s my go-to because it never lets me down.
- Budget-Friendly Staples: You’re already stocking these ingredients. Flour, butter, salt—basic stuff that costs next to nothing but makes everything taste like a bakery. Between us, I’ve used this crust for years and never once regretted the grocery bill.
Step-by-step instructions for buttery pie crust layers
This method delivers a flaky, golden crust that stays perfect through baking—no shrinking or soggy bottoms here.
Combine Dry Ingredients for Light Texture
In a large bowl, whisk together the 2.5 cups all-purpose flour, 0.5 teaspoon Diamond Crystal kosher salt, 1 tablespoon granulated sugar, and 0.25 teaspoon ground black pepper. I sift the flour first for an ultra-light texture—this prevents dense spots in your crust. The sugar and pepper might seem unusual, but they balance the salt and add subtle warmth to every bite.
Real talk: don't skip the sifting. Unsifted flour creates pockets of air that can lead to uneven baking. Use a whisk to break up any flour lumps so everything mixes evenly. The sugar also helps create a slightly crispier edge while preventing the crust from becoming too brittle.
Cut in Cold Butter for Maximum Flakiness
Add the 1 cup cold, cubed unsalted butter to the dry ingredients. Using a pastry cutter or two forks, work the butter into the flour until you have pea-sized crumbs with some larger butter pieces remaining. This is crucial—the butter creates steam pockets during baking that give you that signature flaky texture.
Here's the thing—your butter should still be cold after this step. If it starts to melt, pop the bowl in the freezer for 5 minutes to firm it up again. Overworked butter leads to tough crusts, so be gentle. You want to see some butter pieces still visible when you're done—this ensures those beautiful layers when baked.
Add Wet Ingredients and Form the Dough
In a small measuring cup, combine the 0.5 cup ice water and 1 teaspoon white vinegar. The vinegar might seem odd, but it brightens the flavor and helps tenderize the gluten. Add this mixture to the butter-flour mixture all at once, then stir with a fork until the dough just comes together.
Don't overmix—just until the dough forms a shaggy mass. If it's too dry, add 1 teaspoon more ice water; if too sticky, sprinkle in 1 tablespoon more flour. The dough should be cool to the touch and hold together when pressed. Wrap it tightly in plastic wrap and chill for at least 1 hour—this resting time is non-negotiable for flaky layers.
Roll Out and Transfer to Pie Dish
On a lightly floured surface, roll the chilled dough into a 12-inch circle about ⅛-inch thick. I like to use a rolling pin with guides to ensure even thickness. Transfer the dough to your pie dish, gently shaping it to fit the bottom and sides. Press it lightly into the dish, being careful not to stretch the dough.
Here's where precision matters: trim any excess dough hanging over the edge. For a classic double-crust pie, roll out another crust and place it on top, leaving a small opening for steam to escape. Crimp the edges decoratively with your fingers or a fork. The key is to keep the edges sealed but not too thick—this prevents shrinking during baking.
Blind-Bake for Perfect Support
Preheat your oven to 375°F. For a bottom crust, line it with parchment paper, fill with pie weights or dried beans, and bake for 15 minutes. Remove the weights and bake 5-7 more minutes until the edges are golden brown. For a double crust, prick the top crust with a fork before baking to prevent puffing.
Watch those edges—they should be golden brown but not burnt. If they brown too quickly, tent with foil. The crust is ready when it's firm to the touch and holds its shape. This blind-baking step ensures your filling stays warm and your crust stays crispy, not soggy. Trust me, this makes all the difference for that perfect pie texture.
Pro Tips For Making American Pie Crust
- CHILL THE BUTTER FIRST: Take your unsalted butter straight from the fridge and cut it into ½-inch cubes—no need to soften it. Cold butter creates flaky layers, and I learned this after making a pie crust that turned out more like a dense cracker. (Yes, even if you're impatient like me.)
- USE ICE WATER, NOT COLD: Fill your measuring cup with actual ice cubes and water, then stir until it’s just slushy—about 1 tablespoon of ice per tablespoon of water. Cold water weakens gluten, but ice keeps the dough firm longer, and that’s the thing that matters most for handling. Trust me, your crust will thank you.
- STOP WHEN IT’S SHAGGY: Mix the dough until it looks like wet sand or fine crumbs—no flour streaks, but not a smooth ball. Overworking it develops gluten, and suddenly you’ve got a tough pastry instead of a tender, melt-in-your-mouth crust. I used to push until it came together; now I stop at "shaggy" and save myself the regret.
- SALT THE BUTTER, TOO: Sprinkle the ½ teaspoon of kosher salt directly over the butter cubes before mixing with flour. That way, every bite gets a consistent salt hit, not just where the filling touches the crust. (I know, I know—it’s an extra step, but your slice will taste like it’s from a bakery.)
Health benefits of these flavors
Heart-Healthy Fat Focus
The butter in this crust provides monounsaturated fats that support heart health when consumed in moderation. A single serving (about ⅛ of the crust) contains roughly 12 grams of fat, with 7 grams being heart-healthy monounsaturated fats from the high-fat butter.
These fats help reduce LDL cholesterol when balanced with a diet rich in vegetables and lean proteins. 💪
Gluten Sensitivity Note
While this recipe uses all-purpose flour, you can adapt it for gluten-free diets by substituting 1:1 gluten-free all-purpose flour blend (like Bob's Red Mill 1-to-1). The texture will be slightly less flaky, but it still delivers that golden-brown perfection.
Just be sure to use a gluten-free measuring cup to avoid compaction.
Low-Carb Adaptation
For a lower-carb version, replace 1 cup of the all-purpose flour with 1 cup almond flour and reduce the ice water by 2 tablespoons. The crust will be slightly denser but still crispy.
This adaptation cuts carbs by about 30% per serving while maintaining the buttery flavor. Perfect for keto-friendly pies!
Fiber Boost Option
Add ¼ cup ground flaxseed to the dry ingredients for a fiber-rich boost. This increases the crust's fiber content by 3 grams per serving while adding a subtle nutty flavor.
The flaxseed also helps bind the dough slightly better, making it easier to handle. Just don't overmix—keep the dough cool and firm.
Allergen Considerations
This crust contains wheat (flour), dairy (butter), and egg (if using for egg wash). For egg-free versions, brush with milk or heavy cream instead. Always check labels on your flour and butter for cross-contamination warnings if allergies are a concern.
The vinegar and salt are typically allergen-free, but verify if you're highly sensitive.
Nutrient Balance Tip
Pair this crust with vegetable-rich fillings like spinach and cheese, or lean protein fillings such as turkey pot pie, to create a more balanced meal. The crust's fat content is offset by the fiber and nutrients in these pairings, making it a satisfying yet balanced dessert option.
Think of it as your canvas for healthier pie creations! ✨
Nutrition facts
Frequently asked questions
Why does my pie crust turn out tough instead of flaky?
The most common cause is warm butter or overworking the dough. Always keep your butter cold—pop your mixing bowl in the freezer for 5 minutes if it starts to soften. Work the butter into the flour just until pea-sized crumbs form, then stop. Overmixing develops gluten, which makes the crust tough. Chill the dough for at least 1 hour before rolling too!
Can I make this crust ahead of time?
This crust keeps perfectly for 3 days at room temperature or 1 month frozen. Wrap tightly in plastic wrap and store in an airtight container. For frozen crusts, thaw overnight in the fridge before using. The longer it rests, the better the texture—just avoid letting it sit at room temperature for more than 2 hours.
What's the difference between this crust and puff pastry?
This is a classic pie crust with a simpler ratio of butter to flour (1:2.5), while puff pastry uses much more butter (1:8) and layers it repeatedly for those signature puffs. Pie crust focuses on flakiness from steam pockets, while puff pastry creates air pockets through folding. For pies, this crust gives sturdy support without the extra effort of folding!
How do I prevent a soggy bottom in my pie?
Always blind-bake the bottom crust for 15 minutes with pie weights or dried beans before adding filling. This creates a barrier that prevents moisture from seeping in. For extra insurance, brush the baked crust with a thin layer of applesauce or egg wash before adding filling—it acts as a moisture shield. Never skip this step for fruit pies!
Can I use this crust for savory pies too?
Yes! Skip the sugar in the recipe for savory applications like pot pies or quiches. The pepper adds warmth that pairs perfectly with meat fillings. For extra flavor, add 1 teaspoon dried herbs (like thyme or rosemary) to the dry ingredients. The same techniques apply—just omit the sweet components and focus on building rich, buttery layers for hearty dishes.