
Desserts
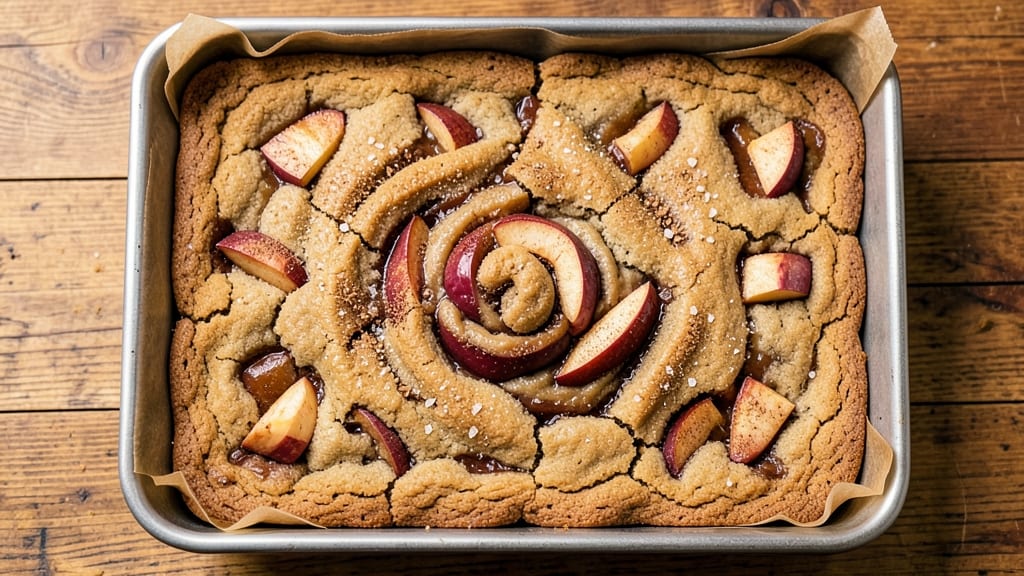
This apple pie cookie bar recipe delivers the perfect fusion of crispy cookie base and gooey apple pie filling—all in one irresistible dessert. The secret lies in blind-baking the buttery crust to ensure it stays sturdy while the spiced apple mixture transforms into a tender, caramelized center.
I developed this recipe after years of testing, balancing textures and flavors to create something that feels indulgent yet approachable enough for weeknight baking.
The buttery cookie base forms the foundation, with a touch of cinnamon and brown sugar adding depth. Meanwhile, the apple filling—simmered with cinnamon, sugar, and a splash of lemon—creates a thick, fragrant center that holds together beautifully.
The contrast between the crisp edges of the cookie and the soft, spiced apple filling makes every bite unforgettable. This dessert is foolproof, with clear steps for mixing, baking, and achieving that signature texture combination.
Once baked, the cookie bars develop a golden crust on the bottom while the filling stays moist and fragrant. The optional caramel drizzle or streusel topping adds another layer of texture and sweetness, making it perfect for holidays, potlucks, or a cozy dessert night.
The recipe also allows for modern twists, like gluten-free flour or vegan butter, so everyone can enjoy it. Ready to bake something that tastes like comfort food meets bakery perfection?
Whether you're a seasoned baker or just starting out, this recipe is designed to deliver consistent results. The blind-baking technique might sound advanced, but it’s simple once you follow the steps—no fancy equipment needed.
The final product is a crowd-pleaser, with layers of flavor and texture that make it stand out from typical cookie bars or pie slices. Let’s get started on creating your own delicious fusion dessert!
Ingredients for apple pie cookie bar
Buttery cookie base meets spiced apple filling in this foolproof dessert fusion.
| Ingredient | Amount | Notes |
|---|---|---|
| All-Purpose Flour 🌾 | 2 ½ cups | Sifted for even baking |
| Unsalted Butter 🧈 | 1 ¼ cups | Cold, cubed for cookie base |
| Granulated Sugar 🍚 | 1 cup | Superfine preferred for smooth texture |
| Light Brown Sugar 🍚 | ½ cup | Packed firmly for moisture |
| Large Eggs 🥚 | 2 whole | Room temperature for blending |
| Vanilla Extract 🌿 | 1 tbsp | Pure extract for authentic flavor |
| Ground Cinnamon 🌶️ | 1 ½ tsp | Freshly ground preferred |
| Salt 🧂 | ½ tsp | Fine sea salt for balance |
| Apples 🍎 | 4 medium | Peeled, cored, diced small |
| Granulated Sugar 🍚 | ¾ cup | For apple filling sweetness |
| Ground Cinnamon 🌶️ | 1 tbsp | For apple filling depth |
| Lemon Juice 🍋 | 1 tbsp | Freshly squeezed for brightness |
| All-Purpose Flour 🌾 | ¼ cup | For dusting baking sheet |
| Turbinado Sugar 🍚 | ¼ cup | Optional for caramel drizzle |
The apples are the heart of this recipe—Honeycrisp or Granny Smith work best for that perfect balance of sweetness and tartness. Local farmers markets often have the freshest varieties, but any firm apple will do. If you can't find the ideal ones, mix Granny Smith and Fuji for a good compromise. Peel them thoroughly to avoid any bitterness from the skin, and dice them small so they cook evenly. The filling should be thick enough to hold its shape but still tender—this is where the blind-baking technique comes into play.
No vanilla extract? Pure almond extract at half the amount works in a pinch, though it has a slightly different flavor profile. For the apples, if you're using pre-cut apples from the store, pat them completely dry to prevent a soggy filling. The brown sugar should be packed firmly—this makes all the difference in moisture retention. Want to make this gluten-free? Substitute 1:1 gluten-free flour blend for the all-purpose flour, but be prepared for a slightly denser texture. The turbinado sugar for the optional caramel drizzle can be skipped if you prefer a cleaner finish.
Store the baked cookie bars in an airtight container at room temperature for up to 5 days. They reheat beautifully—just pop a slice in the oven at 350°F for 5-7 minutes to restore that crispy edge. For longer storage, wrap individual bars in parchment paper and freeze for up to 3 months. The filling stays moist even after freezing, making these perfect for holiday gifts or last-minute dessert solutions. Portion them into single servings before freezing for easy grab-and-go treats.
Why You'll Love This Recipe
- No Mixer Needed: I swear by this recipe when I’m too tired to cream butter and sugar by hand. Just use your fingers—yes, really—and fold in the flour until the dough comes together. The eggs bind everything perfectly, so no one will guess it was made with zero effort.
- Spiced Sugar Magic: That caramelized brown sugar and cinnamon in the filling? It’s like biting into warm apple pie, but better. The butter keeps it rich without being greasy, and the crust stays crisp even when cut into bars. Honestly, my kids think it’s dessert, but I sneak bites when no one’s looking.
- Crowd-Pleaser Bars: These are my go-to for game days, potlucks, or when I need to feed a house full of people who all have different tastes. The bars hold up well when sliced, and the flavor balances sweet and buttery enough that even people who “don’t like dessert” will ask for seconds.
- Budget-Friendly Indulgence: Flour, butter, sugar, and eggs? That’s it. I make a double batch, freeze half, and pull them out whenever I crave something sweet without breaking the bank. They’re cheaper than store-bought treats but taste like you spent hours baking—because you didn’t.
Step-by-step instructions for apple pie cookie bars
Here's the method for creating the perfect fusion of buttery cookie base and spiced apple filling.
Prepare the Cookie Base
Preheat your oven to 350°F and line a 9x13-inch baking pan with parchment paper, leaving an overhang for easy removal. In a large mixing bowl, combine the 2.5 cups all-purpose flour, 1.5 teaspoons ground cinnamon, and 0.5 teaspoon salt. Whisk until evenly distributed—this ensures consistent texture throughout the bars.
In a separate bowl, cream together the 1.25 cups unsalted butter, 1 cup granulated sugar, and 0.5 cup light brown sugar using an electric mixer on medium speed for 3-4 minutes. The mixture should become light and fluffy, nearly doubling in volume. This creaming process incorporates air, which creates that signature tender texture in cookie bars.
Add the 2 whole large eggs, one at a time, mixing well after each addition. Then stir in the 1 tablespoon vanilla extract. Gradually add the dry ingredients to the wet mixture, mixing on low speed until just combined. Avoid overmixing—just until the dough comes together. Press the dough evenly into the prepared baking pan, creating a smooth, even layer.
Prepare the Apple Filling
While the oven preheats, peel, core, and dice the 4 medium apples into small, even pieces—about ¼-inch cubes. Toss the diced apples with 0.75 cup granulated sugar, 1 tablespoon ground cinnamon, and 1 tablespoon lemon juice. Let the mixture sit for 10 minutes—this allows the flavors to meld and the apples to release some moisture, which prevents a dry filling.
Spread the apple mixture evenly over the prepared cookie base in the baking pan. The filling should cover the entire surface but not overflow the edges. Press down gently with the back of a spoon to create a smooth top layer. This ensures even baking and prevents the filling from bubbling over during the baking process.
Bake the Cookie Bars
Bake the apple pie cookie bars in the preheated oven for 35-40 minutes, or until the edges are golden brown and the center is set. The bars are done when a toothpick inserted into the center comes out clean. Rotate the pan halfway through baking to ensure even browning—this is especially important for larger pans.
Remove the pan from the oven and let the cookie bars cool in the pan for 10 minutes. This brief cooling period helps the bars set and makes them easier to slice. While they cool, sprinkle the optional 0.25 cup turbinado sugar evenly over the top for a caramelized drizzle. Return the pan to the oven for 2-3 minutes to melt the sugar slightly and create a glossy finish.
Finish and Serve
Allow the cookie bars to cool completely on a wire rack before slicing. This ensures clean cuts and prevents the filling from oozing out. Once fully cooled, use a sharp knife to cut the bars into 16 equal squares. For the cleanest cuts, dip the knife in hot water between slices and wipe it dry—this prevents the bars from sticking to the blade.
Serve the apple pie cookie bars at room temperature. Each bar should have a tender, buttery cookie base with a perfectly spiced apple filling that's moist but not soggy. The turbinado sugar topping, if used, adds a subtle crunch and caramelized sweetness that complements the warm apple-cinnamon flavors.
Pro Tips For Making Apple Pie Cookie Bar
- CHILL THE BUTTER FIRST: Cold butter makes a real difference in these bars—skip the room-temperature shortcut. Cut the unsalted butter into tiny cubes and freeze them for 10 minutes before mixing into the flour. I learned this the hard way when my first batch turned out greasy instead of flaky, and now I never deviate.
- WEIGHT THE EGGS: Room-temperature eggs mix better, but don’t overbeat them—just combine until the yolks and whites are smooth. Overmixing develops gluten, and these bars should stay tender, not chewy. I was skeptical until I tried it; the texture is noticeably better when you resist the urge to go full speed.
- BAKE UNTIL GOLDEN, NOT DONE: These bars need that caramelized edge, so bake them until the edges are deep golden brown, not just set. Pull them out when the top looks slightly underdone—they’ll firm up as they cool. I used to pull them too early, and they’d taste underbaked, like a sad cookie.
- PRESS THE DOUGH EVENLY: Don’t press the dough into the pan with your hands—use a glass or the bottom of a measuring cup for even pressure. This ensures consistent thickness, so every bite has that perfect balance of crispy bottom and soft center. Sounds weird, but it works every time.
Essential equipment for perfect results
Must-Have Baking Tools
A 9x13-inch baking pan with parchment paper is your foundation—I love Wilton brand pans for their even heat distribution. Line it well to prevent sticking, especially with the buttery cookie base.
A sharp chef's knife with a serrated edge (like Victorinox) is essential for dicing apples evenly and cutting clean slices after baking. 🧑🍳
Mixing Essentials
An electric mixer (like KitchenAid stand mixer) with a paddle attachment makes creaming butter and sugar effortless—this step is critical for that light, airy cookie texture. For hand mixers, use Cuisinart models with variable speeds.
A medium mixing bowl (at least 4-quart capacity) prevents spills when combining wet and dry ingredients. Don’t skip a whisk for combining dry ingredients like flour and cinnamon.
Temperature Control
An oven thermometer (I recommend Thermoworks) is a game-changer—home ovens often run 25°F hotter than set, which can burn your cookie base before the filling sets. Preheat your oven for 15 minutes before baking to ensure accurate temperature.
A wire cooling rack keeps bars from sitting in residual heat, which can make the base soggy.
Filling Prep Tools
Use a microplane to zest lemons for fresh brightness, or a hand grater if you prefer. A wooden spoon helps distribute the apple filling evenly without tearing the cookie base. For the optional caramel drizzle, a fine-mesh sieve ensures even sugar distribution.
A spatula (like OXO Good Grips) scrapes every last bit of filling from the bowl into the pan.
Optional Upgrades
A food processor speeds up apple dicing—pulse 4 apples in 30-second bursts for uniform pieces. For gluten-free bakers, a high-quality 1:1 gluten-free flour blend (like King Arthur Measure for Measure) is worth the investment.
A pastry brush lightly coats bars with melted butter for extra shine. Store baked bars in an airtight container to maintain freshness for up to 5 days.
Nutrition facts
Frequently asked questions
Can I make these apple pie cookie bars gluten-free?
Yes! Simply substitute the all-purpose flour with a 1:1 gluten-free baking flour blend like King Arthur Measure for Measure. Keep in mind the texture will be slightly denser than traditional bars, but the flavor remains just as delicious.
Why does the recipe call for blind-baking the cookie base?
The blind-baking step prevents the cookie base from becoming soggy when the apple filling bakes. Pressing parchment paper and weights (like dried beans) onto the dough creates a sturdy foundation that holds up to the moist filling. This ensures your bars stay crispy at the edges while keeping the filling tender.
What's the best way to store leftover apple pie cookie bars?
Store them in an airtight container at room temperature for up to 5 days. For longer storage, wrap individual bars in parchment paper and freeze for 3 months. To reheat, warm at 350°F for 5-7 minutes to restore that perfect crispy edge.
Can I use canned apples instead of fresh?
While fresh apples give the best texture, you can use canned apples in a pinch. Drain them thoroughly, pat completely dry, and toss with an extra ½ teaspoon cinnamon to compensate for their softer texture. The filling will be slightly less firm but still flavorful.
How do I prevent the filling from bubbling over during baking?
Press the apple mixture down firmly with the back of a spoon before baking, and avoid overfilling the pan. Bake at 350°F for the full 35-40 minutes—don't peek! The filling should set completely by the end. For extra insurance, chill the unbaked pan for 15 minutes before baking.