
Main Courses
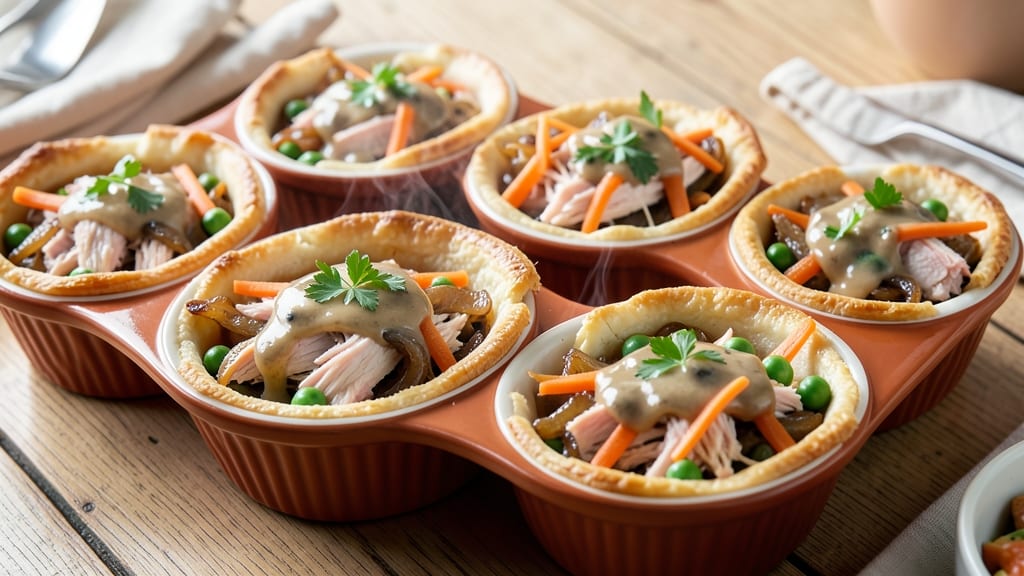
This pot pie cups recipe delivers all the cozy, savory comfort of classic pot pie in bite-sized, handheld portions. 💛 The secret lies in the gravy-infused crust that locks in every flavorful bite, transforming a familiar dish into something new and exciting.
Perfect for gatherings or meal prep, these mini pot pies bring restaurant-quality comfort to your table with minimal effort.
The magic happens in the layers: tender chicken and vegetables nestled in a rich gravy, all topped with a flaky crust that bakes to golden perfection.
What sets these apart is the crust's dual role—it doesn't just top the pie, it absorbs and enhances the gravy's flavor with every bite. The result? A dish that's as satisfying as it is elegant, with the convenience of single-serving portions.
By the time these pot pie cups emerge from the oven, you'll have crispy, golden crusts encasing warm, savory fillings that practically melt in your mouth. The gravy stays rich and flavorful, not watery, thanks to a simple thickening technique that ensures every bite is packed with comfort.
This recipe is designed to impress without the fuss, making it ideal for busy weeknights or special occasions.
Whether you're serving them as appetizers, a hearty lunch, or a comforting dinner, these pot pie cups are sure to disappear quickly. The best part? They reheat beautifully, so you can enjoy them fresh or save leftovers for later.
Let's get started on creating these delicious mini comfort bites that bring the warmth of pot pie to every table.
Ingredients for pot pie cups
Pantry staples and a few fresh ingredients create these cozy, handheld comfort bites perfect for any occasion.
| Ingredient | Amount | Notes |
|---|---|---|
| All-Purpose Flour 🌾 | 3 cups | For crust and gravy thickening |
| Unsalted Butter 🧈 | 1 cup | Cold, cubed for crust |
| Chicken Breast 🍗 | 1 ½ lb | Boneless, skinless, diced small |
| Yellow Onion 🧅 | 1 whole | Diced, about 1 cup |
| Carrots 🥕 | 2 medium | OR 1 cup diced |
| Frozen Peas 🌱 | 1 cup | Thawed before using |
| Chicken Broth 💧 | 1 ½ cups | Low-sodium preferred |
| Heavy Cream 🥛 | ½ cup | Full-fat for richness |
| Milk 🥛 | ½ cup | Whole milk preferred |
| Garlic Cloves 🧄 | 3 cloves | Minced for flavor |
| Salt 🧂 | 1 ½ tsp | Kosher or sea salt |
| Black Pepper 🌶️ | ½ tsp | Freshly ground |
| Dried Thyme 🌿 | 1 tsp | OR 1 tbsp fresh |
| All-Purpose Flour (extra) 🌾 | ½ cup | For gravy thickening |
The crust is where the magic happens. King Arthur or Bob's Red Mill flour gives the best texture—light but sturdy. For the butter, Plugrá or Land O'Lakes work perfectly, but grab the unsalted kind so you control the seasoning. The chicken should be diced into pea-sized pieces—smaller means faster cooking and more even baking. Carrots can be pre-shredded from the bag if you're short on time, but fresh grated has better texture. I always grab frozen peas from Trader Joe's—they're pre-thawed and ready to use, saving me a step.
No chicken broth? Vegetable broth works just as well—just add a pinch of poultry seasoning if you're worried about flavor. Heavy cream too expensive? Half-and-half or whole milk stretches it further, though the texture will be slightly lighter. Short on thyme? Dried oregano at half the amount gives a similar earthy note. The carrots can be swapped for zucchini or sweet potatoes if you prefer. For the crust, if you don't have pie weights, dried beans or rice in a thin layer works perfectly to keep it from puffing up too much in the oven.
The crust dough can be prepped 2 days ahead and stored wrapped in plastic in the fridge. The filling keeps 3 days in the fridge before baking, so you can assemble these whenever you're ready. Once baked, they reheat beautifully—350°F for 10-15 minutes until the crust is golden again. I always make a double batch and freeze half. They thaw in 20 minutes in the oven, perfect for quick weeknight dinners.
Why You'll Love This Recipe
- No-Fuss Assembly: I swear by these cups—just press dough into a mini muffin tin, fill with shredded chicken, sautéed onions, and carrots, then bake. No rolling, no fuss, no stress. My kids can help with the pressing (and usually lick the bowl afterward).
- Golden Crisp Magic: That buttery crust meets tender chicken and sweet carrots in every bite—it’s the kind of combo where the first one disappears fast, and you’re already planning the next batch. Honestly, the crispy edges alone make it worth it.
- Party or Pantry: Pack them for game day, freeze extras for lazy days, or serve them at a potluck—no one will guess they’re one-handed bites. Between us, they’re my go-to for book clubs, too. (Yes, even when I forget to RSVP.)
- Budget-Friendly Feast: Chicken thighs or breasts stretch further than you’d think, and the veggies bulk it up without breaking the bank. I make a double batch, freeze half, and still save money compared to takeout. Plus, the leftovers reheat like a dream.
Step-by-step instructions for pot pie cups
Here's how to create these cozy mini pot pies with a gravy-infused crust.
👨🍳 Step 1: Prepare the Chicken and Vegetable Filling
In a large skillet, heat 2 tablespoons of the unsalted butter over medium-high heat. Add the 1.5 lb diced chicken breast and cook for 5-6 minutes until the chicken is no longer pink in the center. Remove the chicken and set it aside temporarily.
In the same skillet, add the remaining 6 tablespoons unsalted butter and melt it over medium heat. Add the 1 whole diced yellow onion and 2 medium diced carrots, cooking for 5-6 minutes until the vegetables soften and become translucent. Stir in the 3 minced garlic cloves and cook for 30 seconds until fragrant.
Return the chicken to the skillet and add the 1 cup thawed frozen peas, 1.5 cups chicken broth, 1.5 tsp salt, 0.5 tsp black pepper, and 1 tsp dried thyme. Bring to a simmer and cook for 8-10 minutes until the vegetables are tender and the liquid has reduced slightly. Remove from heat and set aside.
👨🍳 Step 2: Make the Gravy-Infused Crust Dough
In a large mixing bowl, combine the 3 cups all-purpose flour, 1 tsp salt, and 0.5 tsp black pepper. Cut in the 1 cup cold cubed unsalted butter using a pastry cutter or your fingers until the mixture resembles coarse crumbs with pea-sized butter pieces remaining.
Add 0.5 cup milk and mix with a fork until the dough begins to come together. Gradually add the remaining 0.5 cup milk until the dough forms a shaggy mass. Turn the dough out onto a lightly floured surface and knead gently for 2-3 minutes until smooth. Wrap in plastic wrap and chill in the refrigerator for 30 minutes.
While the dough chills, prepare the gravy mixture by whisking together the 0.5 cup heavy cream and 0.5 cup all-purpose flour (extra) in a small bowl. Set aside.
🍳 Step 3: Assemble the Pot Pie Cups
Preheat your oven to 375°F. Roll out the chilled dough to about 1/8-inch thickness on a lightly floured surface. Use a 2-inch round cutter to cut out circles for the crusts. Press each circle into the bottom of a greased mini muffin tin or ramekin to form the crust base.
Fill each crust base with about 2 tablespoons of the chicken and vegetable filling. Spoon about 1 teaspoon of the gravy mixture over each filling. The gravy will help create that signature pot pie flavor in every bite.
Roll out the remaining dough and cut out additional circles to form the tops for the pot pie cups. Place a top on each filled crust, pressing gently to seal. Use a fork to crimp the edges, creating a decorative pattern. Cut small slits in the tops to allow steam to escape.
🔥 Step 4: Bake to Golden Perfection
Bake the pot pie cups for 20-25 minutes until the crusts are golden brown and the filling is bubbling through the slits. For the last 5 minutes, increase the oven temperature to 400°F to ensure the crust gets crispy.
Remove from the oven and let cool for 5 minutes before carefully removing the pot pie cups from the muffin tin. Serve warm, and you'll get that comforting pot pie flavor in every bite of these mini versions.
⏰ Step 5: Optional Broth Bath for Extra Flavor
For an extra boost of flavor, place the baked pot pie cups in a baking dish and pour 1/2 cup chicken broth into the bottom. Bake at 350°F for an additional 10 minutes. This creates a rich, gravy-like bath that soaks into the crust, making each bite even more delicious.
These pot pie cups are perfect for appetizers, snacks, or even a comforting dessert with a scoop of ice cream. Enjoy your homemade mini pot pies!
Pro Tips For Making Pot Pie Cups
- Trim the Chicken First: Cut the chicken breast into even ½-inch slices before adding it to the cups—thicker pieces stay rubbery while thinner ones cook through perfectly. I used to fight with uneven slices, and now I just eyeball the thickness with a ruler for consistency.
- Sweat the Onions Low: Cook the onions on medium-low heat until translucent, not browned—this keeps them tender and prevents them from turning bitter in the filling. After burning two batches, I learned patience pays off here.
- Pre-Cook the Carrots: Parboil the carrots for 3-4 minutes before dicing—this softens them faster and prevents them from turning mushy in the oven. I skip this and regret it every time.
- Chill the Dough: Roll out the flour-butter dough, wrap it in plastic, and refrigerate for 15 minutes before cutting tops—this makes it easier to handle and prevents shrinking. Sounds weird, but it works every time.
Troubleshooting this recipe
Crust Won’t Hold
If your crust dough cracks or collapses during baking, it’s usually due to overworked dough or insufficient chilling. I find that kneading for more than 2-3 minutes can develop gluten too much, making the crust tough.
Always chill the dough for the full 30 minutes—this relaxes the gluten and prevents shrinking. For extra stability, brush the crusts with a light coat of egg wash before baking. 🌟
Filling Too Watery
When the filling leaks through the crust slits, it’s often because the gravy wasn’t thickened enough. Always cook the filling until the liquid reduces by about 25%. If it’s still too soupy, whisk in 1 extra tablespoon of flour and cook for another 2-3 minutes.
For a foolproof method, I blend ½ cup of the cooked filling with the gravy mixture before adding it to the cups—this creates a thicker, more cohesive sauce. ⚡
Uneven Baking
Pot pie cups often bake unevenly if the oven isn’t preheated properly or if the muffin tin isn’t level. Always preheat your oven for at least 15 minutes before baking. Place the muffin tin on the middle rack to ensure even heat distribution.
If your oven runs hot, reduce the temperature by 25°F (e.g., bake at 350°F instead of 375°F). Rotate the tin halfway through baking for consistent results. 🔥
Crust Too Pale
A pale crust usually means it didn’t get hot enough for long enough. The final 5 minutes at 400°F is crucial for achieving that golden color. If your crusts are still pale, try brushing them with a little milk or melted butter before the final broil.
For an extra boost, place a baking sheet under the muffin tin to reflect heat upward. Just watch closely to avoid over-browning! 💛
Filling Not Cooked Through
If the filling remains undercooked, it’s likely because the pot pie cups weren’t baked long enough or the oven temperature fluctuated. Always bake until the internal temperature of the filling reaches 165°F. For extra insurance, I recommend using an instant-read thermometer.
If your filling is still cold after baking, return the cups to the oven for 5-10 minutes at 350°F, covered loosely with foil. 🌡️
Gravy Separates
Gravy separation happens when the fat and liquid aren’t properly emulsified. To prevent this, whisk the gravy mixture vigorously before adding it to the cups. For an extra stable gravy, add 1 teaspoon of Dijon mustard** to the gravy mixture—it acts as a natural emulsifier.
If separation occurs, simply reheat the gravy gently while whisking continuously until smooth again. 💡
Nutrition facts
Frequently asked questions
Can I make these pot pie cups vegetarian?
Swap the chicken for 1.5 lb mushrooms (like cremini or shiitake) or 1 block firm tofu, cubed and pan-fried. Use vegetable broth instead of chicken broth and add 1 cup corn kernels or diced butternut squash for extra heartiness. The crust and gravy will still shine with the same rich flavor.
How long can I store or freeze the assembled cups?
Assembled (unbaked) pot pie cups can be refrigerated for 24 hours before baking. For freezing, wrap each cup tightly in plastic wrap and place in a freezer bag. They'll keep for 1 month in the freezer. To bake from frozen, add 10-15 extra minutes at 375°F until the crust is golden.
What's the best way to reheat these cups?
For best results, reheat in a 350°F oven for 10-15 minutes until the crust is crispy and filling is hot. Microwave reheating works but may make the crust soggy. If using a toaster oven, cover with foil for the first 5 minutes to prevent over-browning.
Can I use store-bought pie crust instead?
Yes! For convenience, use 2 sheets of refrigerated pie crust (about 1/8-inch thick each). Roll and cut the circles as directed, but skip the chilling step. The gravy-infused flavor will still come through, though homemade crust gives a lighter texture. Press the edges firmly to prevent leaks during baking.
Why do my crusts puff up instead of staying flat?
This happens when steam builds up without escape. Always cut 3 small slits in each top crust before baking. For extra insurance, place a light layer of dried beans in the muffin tin before adding the crust bases. This creates a barrier that prevents the crust from puffing upward.