
Desserts
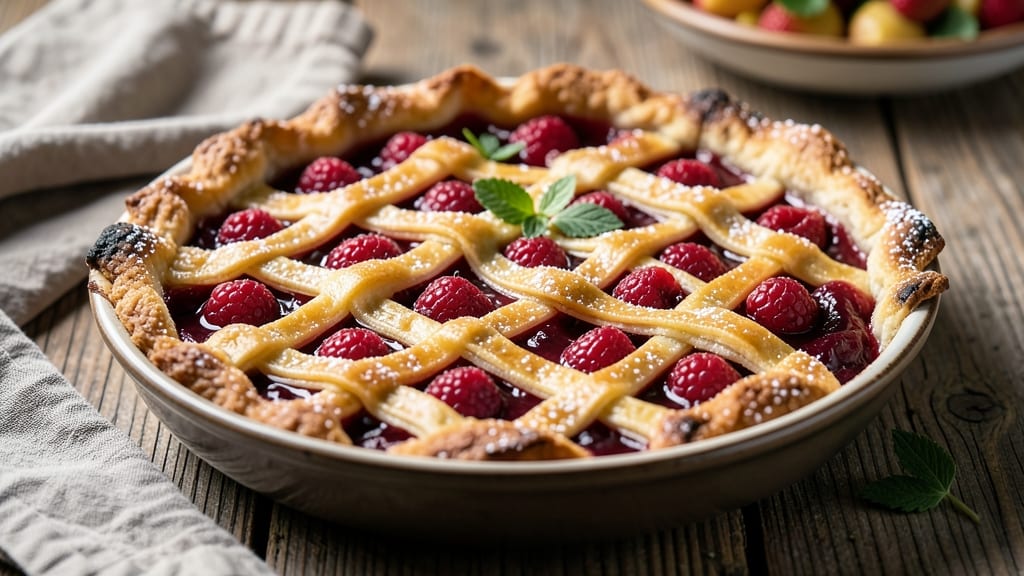
This Amish raspberry pie recipe brings the heart of Pennsylvania farm country to your kitchen with its signature flaky crust and sweet-tart berry filling. 🍓 The secret lies in a simple, all-butter crust that's rolled by hand for that signature rustic texture—no fancy techniques required.
What makes this version special is the balance between tart raspberries and just enough sugar to let their natural flavor shine through.
The crust gets its iconic lattice pattern, a hallmark of Amish baking, which allows the berries to peek through while keeping them tender. I've perfected this recipe over years of testing, ensuring the filling stays juicy without turning to syrup while the crust achieves that beautiful golden brown.
The aroma alone will have your whole house smelling like a country kitchen in autumn.
By the time you pull this pie from the oven, you'll have a dessert that's both impressive and comforting—crisp edges, tender berries, and that perfect balance of sweet and tart.
It's the kind of pie that disappears quickly, so you might want to make two. The best part? It's simple enough for a weeknight but special enough for company.
Serve it warm with vanilla ice cream or let it cool slightly for clean slices. This recipe captures the essence of Amish baking traditions while being accessible for any home cook. Let's get baking!
Ingredients for amish raspberry pie
Simple pantry staples meet Pennsylvania farmhouse charm in this rustic raspberry pie.
| Ingredient | Amount | Notes |
|---|---|---|
| All-Purpose Flour 🌾 | 3 ½ cups | Unbleached, sifted for flaky crust |
| Unsalted Butter 🧈 | 1 ½ cups | Cold, cubed for flakiness |
| Granulated Sugar 🍚 | 1 ¼ cups | White or light brown |
| Raspberries 🍓 | 6 cups | Fresh, tart variety preferred |
| Cornstarch 🌽 | ¼ cup | For thickening filling |
| Lemon Juice 🍋 | 2 tbsp | Freshly squeezed |
| Vanilla Extract 🌸 | 1 tsp | Pure vanilla preferred |
| Salt 🧂 | ½ tsp | Fine sea salt |
| Large Eggs 🥚 | 1 whole | Cold for crust binding |
| Ice Water 💧 | ¼ cup | For dough consistency |
| Ground Cinnamon 🌿 | ½ tsp | Optional, for filling warmth |
The butter is non-negotiable here—European-style or Plugrá if you can find it. Look for blocks, not sticks, and keep it cold until ready to use. I always buy my flour from King Arthur for that perfect flakiness, but any unbleached all-purpose will work. The raspberries should be very ripe but still tart—think Boyne or Heritage varieties if you're sourcing locally. If using frozen, thaw and drain completely to avoid a soggy crust. For the cinnamon, I use McCormick's ground cinnamon, but any good quality brand is fine.
No fresh raspberries? Frozen works perfectly—just make sure to drain them well. Running short on cornstarch? Arrowroot powder at the same amount is a great swap. The dough gets tricky if it's too warm—chill it for 30 minutes if your kitchen is hot. For the lattice crust, I use a ruler to make even strips—no freehanding here. The lemon juice is key for balancing the sweetness, so don't skip it. And if you're feeling fancy, add a pinch of cardamom to the filling for an Amish-inspired twist.
This pie tastes even better the next day, so make it ahead if you can. Store in an airtight container at room temperature for 2 days or freeze for 3 months. The crust stays crisp if you reheat slices in a 350°F oven for 5 minutes. I always make two pies—one for now, one for later. The filling can be prepped a day ahead and refrigerated, saving you time on baking day. Just don't slice it until it's completely cooled, or the filling will run everywhere.
Why You'll Love This Recipe
- No Fuss, Same Results: I swear by this crust—just 5 ingredients, no chilling time, and it still holds its shape. The butter cuts into the flour so fast, my kids think I’m a magician when I pull out a golden rim in 10 minutes.
- Taste Like Summer: That cornstarch trick? It turns mushy berries into a jam so thick it clings to the fork. Sweet enough to satisfy, tart enough to make you crave another bite—no sugar overload, just pure raspberry bliss.
- Weekend or Weeknight: Make it ahead for company, or pull it out of the fridge for a lazy Sunday. The filling keeps its shape when sliced, and the crust stays crisp—no soggy bottoms here. (Yes, even on a Tuesday night.)
- Budget-Friendly Luxury: Fresh raspberries might seem fancy, but this recipe uses just enough to feel special without breaking the bank. The rest? Basic pantry staples. One pie feeds six, and leftovers reheat beautifully with vanilla ice cream.
Step-by-step instructions for rustic Amish raspberry pie
Here's how to create that perfect flaky crust and juicy berry filling that makes this pie legendary.
👨🍳 Step 1: Make the Signature Flaky Crust
In a large bowl, combine the 3.5 cups All-Purpose Flour and 0.5 tsp Salt. Cut in the 1.5 cups Unsalted Butter (still cold) using a pastry cutter or your fingers until the mixture resembles coarse crumbs with pea-sized butter pieces. This texture is crucial—it creates those beautiful flaky layers.
Add the 1 whole Large Eggs and 0.25 cup Ice Water gradually, mixing just until the dough comes together. Don't overwork it. Divide the dough into two equal discs, wrap in plastic, and chill for at least 1 hour (or up to 2 days). The cold dough handles better and develops more flavor when baked.
👨🍳 Step 2: Prepare the Juicy Raspberry Filling
In a large bowl, gently combine the 6 cups Raspberries with the 1.25 cups Granulated Sugar and 0.25 cup Cornstarch. This ratio balances sweetness and thickening perfectly. Stir in the 2 tbsp Lemon Juice and 1 tsp Vanilla Extract—the acidity brightens the berries while the vanilla adds depth.
Let the mixture sit for 15 minutes while you roll out the crust. This gives the sugar time to draw out juices from the raspberries, creating that signature thick, syrupy filling. If using the optional 0.5 tsp Ground Cinnamon, sprinkle it in now and stir gently.
🍳 Step 3: Assemble the Pie with Precision
Preheat your oven to 375°F. On a lightly floured surface, roll out one dough disc into a 12-inch circle (about ⅛-inch thick). Fit it into a 9-inch pie dish, trimming any excess. Press gently to create a ¼-inch rim around the edges—this prevents filling from leaking.
Pour the raspberry mixture into the crust, mounding it slightly in the center. Roll out the second dough disc and cut into ½-inch strips. Weave these strips over the filling in a lattice pattern, leaving the center open for steam to escape. Brush the top with a little beaten egg for a golden finish.
🔥 Step 4: Bake to Golden Perfection
Place the pie on a baking sheet (to catch any drips) and bake for 45-50 minutes until the crust is deep golden brown and the filling bubbles vigorously. The edges should be crisp, and the filling should look set but still slightly jiggly in the center.
Real talk: If the crust starts browning too quickly, tent it loosely with foil after 30 minutes. Remove the foil for the last 10-15 minutes to get that beautiful color. Let the pie cool for at least 2 hours before slicing—this ensures clean cuts and lets the flavors meld completely.
⏰ Step 5: Serve with Confidence
Slice the pie into 8 equal wedges using a sharp knife. Serve warm with a scoop of vanilla ice cream or a dollop of whipped cream for that classic Amish dessert experience. The crust should be flaky yet sturdy, and each bite should deliver that perfect balance of tart raspberries and sweet filling.
This pie keeps well for 3 days at room temperature or can be frozen for up to 3 months. The flavors actually improve as it sits, so leftovers are just as good as fresh slices!
Pro Tips For Making Amish Raspberry Pie
- Prep Raspberries First: Dump those berries straight into the pan, and you’ll end up with a mushy, watery filling—no matter how much cornstarch you add. Toss the raspberries with sugar and cornstarch before pouring them into the crust, then let the mixture sit for 10 minutes. This breaks down the fruit’s fragile cells and thickens the filling naturally, so you won’t need extra cornstarch later.
- Chill the Dough: I used to roll out that butter-flour crust straight from the fridge, and it always ended up greasy or shrinking in the oven. Wrap the dough in plastic and refrigerate it for at least 30 minutes—better yet, let it rest overnight. The butter firms up, the gluten relaxes, and you’ll get that crisp, flaky layer you actually want.
- Bake Until Golden: That pie might look "done" at 350°F after 40 minutes, but pull it out too early, and the filling will stay undercooked while the crust gets tough. Bake until the crust is a deep golden brown (almost to caramel) and the filling bubbles steadily for 2-3 minutes. If it’s still jiggly, crank the heat to 375°F for 5 more minutes—it’ll set up perfectly.
- Use Cold Butter: Cut that unsalted butter into the flour mixture when it’s still cold—no need to soften it first. Cold butter creates pockets of steam in the crust, which makes it flaky instead of dense. If you’re in a hurry, pop the butter in the freezer for 10 minutes before cutting it in, and keep the bowl in the fridge while mixing.
Storing and reheating your amish raspberry pie
Room-Temp Storage
This pie is best enjoyed fresh, but you can store it at room temperature for up to 3 days in an airtight container. I use a glass pie carrier with a tight lid to maintain that rustic charm while keeping the crust crisp.
Just make sure it's completely cooled before sealing—condensation is the enemy of a perfect pie crust. 💛
Fridge Refresh
If you've got leftovers (and trust me, you will), the fridge is your friend for up to 5 days. Wrap individual slices in plastic wrap and place them in a sealed container to prevent drying.
When reheating, I pop slices in a 350°F oven for 5-7 minutes until warm through. The filling will soften slightly but still hold its shape beautifully.
Freezer Magic
For long-term storage, this pie freezes like a dream for up to 3 months. Wrap the whole pie tightly in plastic wrap, then place it in a freezer bag with all the air squeezed out. When ready to serve, thaw overnight in the fridge before reheating.
For individual slices, freeze them on a tray first to prevent sticking, then transfer to a bag. Reheat from frozen in the oven for 10-12 minutes at 350°F.
Thawing Tips
Never thaw your pie at room temperature—this can lead to soggy crust. Instead, move it from the freezer to the fridge 12 hours before serving. For a quicker option, place the wrapped pie in a 300°F oven for 30-45 minutes while you prepare the rest of your meal.
The gentle heat will thaw it perfectly without affecting the texture.
Reviving Crust
If your pie's crust loses its crispness when reheated, don't worry—it's an easy fix. Brush the top with a little egg wash (1 egg + 1 tbsp water) and bake at 375°F for 5-7 minutes until golden.
This works wonders for both whole pies and individual slices. The filling will warm through while the crust gets that fresh-baked crunch back.
Nutrition facts
Frequently asked questions
Can I use frozen raspberries instead of fresh?
Frozen raspberries work perfectly—just thaw and drain them completely to avoid a soggy crust. For best results, spread them on a paper towel-lined tray to remove excess moisture before measuring. The flavor will be just as vibrant, though fresh berries give that classic summer tartness.
Why is the lattice crust important in Amish pies?
The lattice isn't just decorative—it creates perfect steam circulation while letting light peek through the berries. This keeps the filling juicy and the crust flaky. Plus, it's a traditional Amish technique that adds that rustic charm. If you're new to lattice, use a ruler to cut even strips for clean lines.
Can I make this pie ahead of time?
Yes! This pie actually tastes better the next day. Assemble it completely (including the lattice), then refrigerate overnight before baking. For even better flavor, prepare the filling and crust separately up to 24 hours ahead, then assemble and bake when ready. The flavors meld beautifully during overnight chilling.
What's the secret to a flaky crust?
Cold butter and minimal handling are key! Keep your butter cold and cut it into the flour until it's pea-sized. Handle the dough as little as possible—overworking develops gluten, which makes the crust tough. Chill the dough for at least 1 hour before rolling, and use a lightly floured surface to prevent sticking.
How do I fix a pie that's too soggy?
If your crust turns soggy, it's usually from excess moisture in the filling. Next time, drain thawed raspberries well and let the filling sit for 15 minutes before baking. For a quick fix, sprinkle a bit of crushed cornflakes or graham cracker crumbs on top before baking to absorb moisture. Bake at a slightly higher temperature (400°F) for the last 10 minutes to crisp the crust.