
Desserts
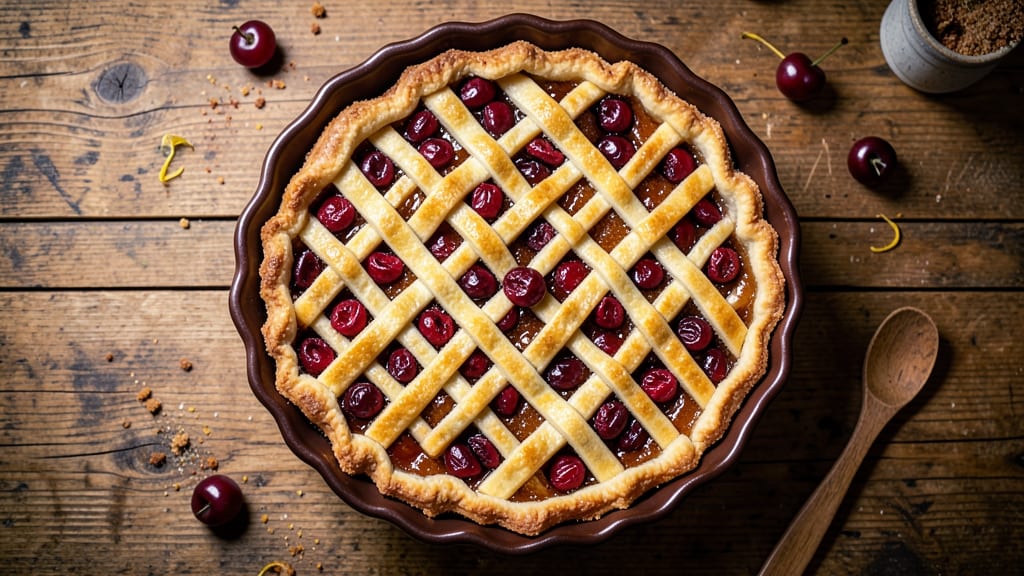
This Amish cherry pie recipe delivers the kind of homestyle dessert that tastes like a Sunday afternoon at a family gathering. The secret lies in a rustic lattice crust that stays crisp while keeping the filling juicy and tart cherries bursting with flavor.
I've perfected this recipe over years of baking, ensuring every slice delivers that perfect balance of sweetness and tang.
The traditional Amish approach focuses on simplicity and quality ingredients, which is exactly what makes this pie special. A deep-dish crust holds a generous filling of pitted cherries, sugar, and cornstarch, creating a texture that's tender yet sturdy enough to hold its shape.
The lattice pattern not only looks beautiful but also allows steam to escape, preventing a soggy bottom.
What you'll end up with is a pie that's rich in tradition yet approachable for home bakers. The lattice crust develops a golden, slightly crisp exterior while maintaining a tender interior, and the cherry filling stays juicy with just the right amount of sweetness.
This is the kind of pie that disappears quickly—perfect for holidays, potlucks, or anytime you want to bring a taste of Amish country to your table.
Serve it warm with a scoop of vanilla ice cream or whipped cream for the full experience. The aroma alone will have everyone asking for seconds. Let's get started on this classic dessert that's worth every bite.
Ingredients for amish cherry pie
Classic pantry staples meet homestyle baking for this juicy, lattice-topped cherry pie.
| Ingredient | Amount | Notes |
|---|---|---|
| Pitted Tart Cherries 🍒 | 4 cups | Fresh or frozen, pitted |
| All-Purpose Flour 🌾 | 3 cups | Unbleached, for crust |
| Unsalted Butter 🧈 | 1 cup | Cold, cubed, for crust |
| Granulated Sugar 🍚 | 1 ½ cups | For filling and crust |
| Light Brown Sugar 🍚 | ¼ cup | Packed, for filling |
| Cornstarch 🌾 | ½ cup | For thickening filling |
| Large Eggs 🥚 | 1 whole | Cold, for crust |
| Ice Water 💧 | ½ cup | For dough consistency |
| Salt 🧂 | 1 tsp | Fine sea salt |
| Cinnamon 🌿 | 1 tsp | Ground, for filling |
| Lemon Juice 🍋 | 2 tbsp | Fresh, for tartness |
| Vanilla Extract 🌸 | 1 tsp | Pure, for filling |
The cherries are the heart of this pie—fresh pitted cherries from a local orchard (if you can find them) give the best flavor, but frozen work perfectly too (just don't thaw them first). For the crust, King Arthur flour or any all-purpose works, but avoid self-rising—we're making this from scratch. The butter? Use European-style butter if you can—it's higher in fat, which makes the crust flakier. If you're in a pinch, store-brand butter still works, but let it sit out for 30 minutes to soften. The lattice crust is all about the even strips of dough—cut them to the same width so they bake uniformly.
No pitted cherries? Use frozen and skip the thawing—just drain them well. Running out of cornstarch? Arrowroot powder works 1:1, but cornstarch gives that classic pie filling set. The brown sugar in the filling? Light or dark doesn't matter—just make sure it's packed into the measuring cup. For the dough, if your kitchen's warm and the butter melts too fast, chill the dough for 30 minutes before rolling. And if you're feeling fancy, add a pinch of almond extract to the filling for depth (trust me, it's worth it). The lattice pattern? Use a ruler to keep those strips straight—it makes all the difference.
This pie tastes even better the next day, so bake it a day ahead if you can. Store it at room temperature in an airtight container with a paper towel on top to keep the crust crisp. For longer storage, wrap tightly in foil and keep it in the fridge for up to 5 days. If you're prepping ahead, you can make the filling and crust separately up to 2 days in advance—just assemble right before baking. And if you've got leftovers? Warm slices in the oven for 5 minutes to revive that fresh-baked magic.
Why You'll Love This Recipe
- No-Fuss Filling: I swear by this recipe’s lazy-but-genius trick: just dump pitted cherries into a bowl with sugar and let them macerate while you roll the crust. No chopping, no fuss—just 10 minutes of hands-off sweetness waiting for you.
- Sweet-Sour Magic: That balance of tart cherries and brown sugar? It’s like summer in a pie. The butter in the crust adds a rich edge, and the granulated sugar keeps the filling from turning into syrup—just the right amount of jammy, not gloopy.
- Weekend or Weeknight: Make it ahead for Sunday brunch or throw it together in 45 minutes when your in-laws drop by unexpectedly. Slices warm with vanilla ice cream? Instant crowd-pleaser. Slices cold the next day? Still delicious. It’s the pie equivalent of a good pair of jeans.
- Budget-Friendly Luxury: Cherries in season are cheap, and this recipe uses pantry staples—flour, butter, sugar—that you already own. A single batch feeds six, and leftovers reheat beautifully. My secret? Double the crust and freeze one for next month’s lazy dessert night.
Step-by-step instructions for Amish cherry pie
Here's how to build a classic lattice-topped pie with a juicy cherry filling that stays thick and flavorful.
Prepare the Cherry Filling
In a large bowl, combine the 4 cups pitted tart cherries, 1.5 cups granulated sugar, 0.25 cup packed light brown sugar, 0.5 cup cornstarch, 1 tsp cinnamon, 2 tbsp lemon juice, and 1 tsp vanilla extract. Stir gently but thoroughly to distribute the sugars evenly. This mixture should look thick but pourable—like a loose batter.
Let the filling sit for 15-20 minutes at room temperature. This resting period helps the cornstarch fully hydrate, which prevents a gummy texture later. If using frozen cherries, thaw them first and drain any excess liquid—the filling should be juicy but not watery.
Make the Pie Crust Dough
In a large mixing bowl, combine the 3 cups all-purpose flour and 1 tsp salt. Cut in the 1 cup cold cubed unsalted butter using a pastry cutter or your fingers until the mixture resembles coarse crumbs with pea-sized butter pieces. Add the 1 whole cold large egg and 0.5 cup ice water, mixing just until the dough comes together.
Turn the dough onto a lightly floured surface and knead gently 4-5 times until smooth. Divide the dough into two equal parts, flatten into discs, wrap in plastic, and refrigerate for at least 1 hour. Chilling prevents the crust from shrinking during baking and makes rolling easier.
Assemble the Pie
Preheat your oven to 375°F. Roll out one dough disc on a floured surface to fit a 9-inch pie dish, leaving a ½-inch overhang on all sides. Transfer the dough to the pie dish and trim the edges neatly. Roll out the second dough disc for the lattice topping.
Pour the cherry filling into the crust, mounding it slightly in the center. Cut the second dough disc into ½-inch wide strips, alternating between long and short strips to create the classic lattice pattern. Press the strips gently into the filling, leaving small gaps for steam to escape.
Bake to Golden Perfection
Place the pie on a baking sheet (to catch any drips) and bake for 45-50 minutes until the crust is deep golden brown and the filling is bubbling gently. The edges should be crisp, and the lattice should look slightly puffed.
Remove the pie from the oven and let it cool for at least 2 hours before slicing. This resting time allows the filling to set properly and prevents a runny pie. Serve warm with vanilla ice cream or whipped cream for the full Amish-style experience.
Pro Tips For Making Amish Cherry Pie
- Preheat Oven to 375°F—Not 350°F: I learned this the hard way after pulling out a pie with a soggy bottom and undercooked filling. Tart cherries need that higher heat to thicken properly and develop their deep flavor. If you’re nervous about burning the crust, blind-bake the bottom crust for 8 minutes before adding filling.
- Use Cold Butter in the Crust: Cut that butter into flour in small pieces, then pulse it in a food processor until it resembles coarse crumbs—no bigger than peas. Cold butter creates flaky layers, and skipping this step means you’ll end up with a tough, greasy mess. Trust me, your fork will notice the difference.
- Simmer Cherries Until Syrupy: Don’t just dump the cherries into the pie and hope for the best. Cook them down with sugar until they release their juices and form a thick, glossy syrup—about 10 minutes on the stove. This prevents a watery filling and ensures every bite has that rich, concentrated cherry flavor.
- Skip the Extra Egg Wash: The classic Amish recipe skips this, and it’s one of those things you won’t miss. Brushing the top crust with egg wash can make it shiny but also gummy. Instead, sprinkle a light dusting of flour over the top before baking—it’ll give you that golden crust without the soggy texture.
Common mistakes when making your amish cherry pie
Overfilling the Pie
This is a classic mistake that leads to soggy crusts and messy spills. The filling should fill the crust to about ½ inch below the rim—any more risks overflow during baking.
I once made this mistake and ended up with cherry filling dripping down the sides of my oven. 🌶️
If you're worried about the filling not looking full enough, mound it slightly in the center. The lattice pattern will help contain it while still allowing steam to escape. Trust me, a slightly underfilled pie is always better than a messy one!
Skipping the Resting Time
Rushing the 2-hour cooling period is a surefire way to end up with a runny, unappetizing pie. The filling needs time to thicken properly as it cools. I’ve seen beginners cut into pies too soon, only to find a watery, unappealing mess. 🍒
If you’re short on time, place the pie on a wire rack to cool slightly faster, but still give it at least 1 hour before slicing. The longer it rests, the better the texture will be.
Uneven Lattice Strips
Inconsistent strip widths in your lattice can lead to uneven baking and a less attractive finish. Use a ruler or pizza cutter to cut strips of equal width—about ½ inch. I’ve seen homemade lattices where some strips are twice as wide as others, leading to patchy browning. 🔥
Alternate long and short strips for a classic look, and press them gently into the filling to secure them. If the strips don’t stick, brush them lightly with water or egg wash before baking.
Using Warm Butter
Starting with butter that’s too soft or melted can make your crust tough and greasy. Always use cold, cubed butter straight from the fridge. I once used butter that was too warm, and my crust turned out more like a dense cookie than a flaky pastry. ❄️
If your kitchen is warm, chill the dough for an extra 30 minutes before rolling. This ensures the butter stays in those perfect pea-sized pieces for a tender crust.
Overmixing the Dough
Mixing the dough too much develops gluten, which can make the crust tough instead of flaky. Once the dough comes together, stop mixing immediately. I’ve seen beginners knead the dough until it’s smooth and elastic, only to end up with a crust that’s more like a cracker. 🥖
Work quickly and gently when combining the dough, and avoid overhandling it. If the dough feels too dry, add just a splash of ice water—no more than 1 tablespoon at a time.
Ignoring the Water Bath
If your filling is very juicy, a water bath can prevent the bottom crust from getting soggy. Place the pie on a baking sheet, then surround the bottom and sides with a rim of water. This is especially helpful if you’re using frozen cherries or a very wet filling. 💧
Skip this step only if your filling is thick and well-balanced. If in doubt, a water bath is a simple insurance policy for a perfect crust.
Nutrition facts
Frequently asked questions about Amish cherry pie
Can I use canned cherries instead of fresh or frozen?
Yes, but with a few adjustments. Drain and rinse canned cherries well to remove excess syrup, then pat them dry. Add an extra 1 tablespoon cornstarch to the filling to compensate for the reduced natural pectin. For best flavor, use light or water-packed cherries over heavy syrup varieties.
How do I make a lattice crust without it falling apart?
Keep your strips ½-inch wide and alternate long/short for stability. Chill the dough for 20 minutes before cutting to prevent sticking. Brush strips lightly with water or egg wash before weaving, and press gently into the filling. If it still collapses, bake with a pie weight or dried beans in the bottom crust first.
Can I make this pie ahead of time?
This pie actually tastes better the next day. Assemble the pie (unbaked) and refrigerate for up to 24 hours before baking. For longer storage, bake it, then keep at room temperature (covered) for 3 days or freeze for 3 months. Reheat slices in a 350°F oven for 5-10 minutes to revive the crust.
What's the secret to a flaky crust?
Cold butter is key! Cut it into ½-inch cubes and keep everything chilled. Work quickly when mixing, and avoid overhandling the dough. The ideal texture is like "wet sand" when kneaded. For extra flakiness, freeze the dough balls for 15 minutes before rolling.
Can I substitute almond flour for regular flour in the crust?
Not recommended for this recipe. Almond flour has different binding properties that won't work well for a traditional pie crust. The crust relies on gluten development for structure, which almond flour lacks. If you want a lower-carb option, try a pre-made gluten-free crust or a nut-based crust designed specifically for pies.