
Desserts
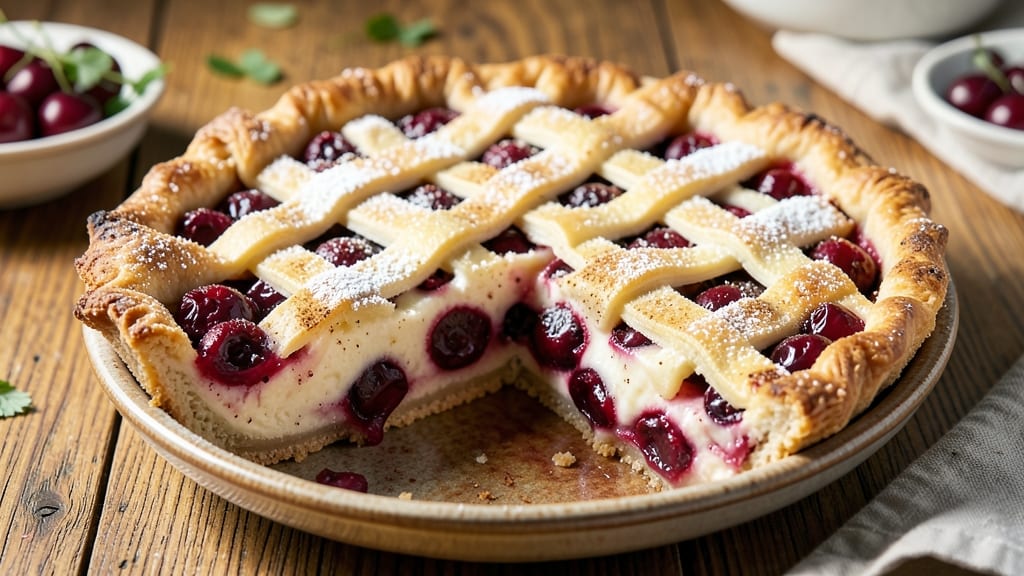
This American cherry pie recipe captures the heart of summer with its perfect balance of tart cherries and buttery crust. 🌸 The secret lies in a lattice crust that creates delicate, golden patterns while keeping the filling perfectly juicy—not too soggy, not too dry.
I’ve perfected this recipe over years of baking, ensuring every slice delivers that nostalgic, homemade taste that store-bought pies just can’t match.
The filling starts with fresh or frozen cherries (pitted, of course) simmered with sugar, cornstarch, and a splash of lemon juice to brighten the flavors. A touch of vanilla and cinnamon adds warmth, while a sprinkle of almond extract deepens the aroma.
The crust? You can make it from scratch for that classic flakiness, or use a high-quality store-bought shortcrust to save time without sacrificing quality.
What makes this pie truly special is the contrast—tender, juicy cherries peeking through the crisp lattice, the buttery crust holding its shape, and that perfect balance of sweet and tart.
It’s the kind of dessert that brings people together, whether it’s a backyard barbecue or a cozy family dinner. The aroma alone will have everyone waiting for the first slice.
Serve it warm with a scoop of vanilla ice cream or whipped cream for the full experience. This pie isn’t just a dessert—it’s a celebration of summer, tradition, and the simple joy of homemade baking. Let’s get started!
Ingredients for american cherry pie
Fresh cherries, buttery crust, and a lattice of golden perfection—this pie is summer in every bite.
| Ingredient | Amount | Notes |
|---|---|---|
| Fresh or Frozen Pitted Cherries 🍒 | 4 cups | Use tart cherries, pitted |
| Granulated Sugar 🍚 | 1 ½ cups | White sugar preferred |
| All-Purpose Flour 🌾 | ¼ cup | For thickening filling |
| Lemon Juice 🍋 | 2 tbsp | Freshly squeezed |
| Vanilla Extract 🌿 | 1 tsp | Pure vanilla preferred |
| Ground Cinnamon 🌶️ | 1 tsp | Freshly ground preferred |
| Almond Extract 🌿 | ¼ tsp | Small amount for depth |
| Unsalted Butter 🧈 | 1 cup | Cold, cubed for crust |
| All-Purpose Flour 🌾 | 2 ½ cups | Plus 1 tbsp for dusting |
| Ice Water 💧 | ½ cup | For crust consistency |
| Salt 🧂 | ½ tsp | Fine sea salt |
| Vanilla Ice Cream 🍦 | 2 cups | For serving (optional) |
Cherries are the star, so pitting them is non-negotiable—frozen works fine, just thaw and drain. Trader Joe's and Costco often carry pre-pitted frozen cherries, saving you time. For fresh, look for vibrant red cherries with stems attached (a sign of freshness). The sugar amount balances tartness—adjust slightly if your cherries are extra sweet. Bob's Red Mill organic sugar adds subtle caramel notes if you want to splurge. Always taste the filling before baking—you want it thick enough to coat the back of a spoon but still juicy.
No almond extract? Skip it—vanilla alone works fine. Short on lemon juice? Lemon zest at half the amount adds brightness without extra moisture. For the crust, store-bought pie crust (like Pepperidge Farm) cuts prep time by 30 minutes—just brush it with egg wash before baking. Need a gluten-free option? Swap flour for a 1:1 gluten-free blend, but add an extra tablespoon of ice water to bind. The lattice pattern? Use a knife to cut strips, then weave them—no fancy tools needed.
Filling keeps 3 days in the fridge, but the pie reheats best the next day. Crust stays crisp for 2 days if stored airtight. Freeze the baked pie (without ice cream) for up to 3 months—thaw overnight in the fridge. For serving, warm slices at 350°F for 5-10 minutes to revive the crust. Double the crust recipe if you're feeding a crowd—this pie disappears fast.
Why You'll Love This Recipe
- Frozen Cherries Work Fine: I swear by this trick—toss frozen pitted cherries straight from the bag into the pie filling. No thawing, no extra work, just dump and stir. The tartness stays bright, and the texture? Still perfect.
- Sweet-Tart Magic: That splash of lemon juice and vanilla extract turns ordinary cherries into something ridiculously good. The sugar caramelizes just enough to make every bite taste like summer, but the acid keeps it from being cloying.
- Weekend or Weeknight: Make it ahead for a potluck or bake it fresh for a lazy Sunday brunch. Slices well, reheats beautifully, and even my picky-eating friends ask for seconds. (Yes, even on a Tuesday night.)
- Budget-Friendly Crowd-Pleaser: Cherries are cheaper than you think, especially frozen, and this crust uses basic flour. One pie feeds six, and leftovers? Perfect for breakfast toast or ice cream topping. No waste, all flavor.
Step-by-step instructions for American cherry pie
Here's how to assemble a classic pie with perfect balance of tart cherries and flaky crust.
👨🍳 Step 1: Prepare the Cherry Filling
In a large mixing bowl, combine the 4 cups fresh or frozen pitted cherries, 1.5 cups granulated sugar, 0.25 cup all-purpose flour, 2 tbsp lemon juice, 1 tsp vanilla extract, 1 tsp ground cinnamon, and 0.25 tsp almond extract. Stir gently but thoroughly to distribute all ingredients evenly. The sugar should begin to dissolve immediately, creating a syrupy base.
For best results, use tart cherries—they need the sugar to balance their natural acidity. If using frozen cherries, don't thaw them first; the cold fruit helps prevent the filling from turning mushy during baking. Here's the thing—don't skip the almond extract. That tiny amount adds depth that makes this pie truly special.
🍳 Step 2: Make the Pie Crust
In a food processor, pulse the 1 cup cold cubed unsalted butter with the 2.5 cups all-purpose flour and 0.5 tsp salt until the mixture resembles coarse crumbs with pea-sized butter pieces remaining. Add the 0.5 cup ice water, one tablespoon at a time, pulsing after each addition until the dough just comes together when pressed.
I know it seems weird to use ice water, but trust me—it prevents the butter from melting during mixing, which is crucial for a flaky crust. The dough should hold together when pressed but not be sticky. If it's too dry, add one more teaspoon of water; if too wet, sprinkle in a bit more flour. Divide the dough into two equal discs, wrap each in plastic, and chill for at least 1 hour or up to 24 hours.
🥘 Step 3: Assemble the Pie
Preheat your oven to 375°F. On a lightly floured surface, roll out one chilled dough disc to fit a 9-inch pie dish, leaving a ½-inch overhang around the edges. Transfer the dough to the pie dish and trim the excess, leaving about ½-inch. Press gently to create a slight rim.
Pour the cherry filling into the prepared crust, mounding it slightly in the center. Roll out the second dough disc and place it on top, trimming to match the bottom crust. Create a simple decorative edge by pinching the top and bottom crusts together every ½-inch around the pie. Cut a few small slits in the top crust to allow steam to escape—this prevents a blown crust.
🔥 Step 4: Bake to Golden Perfection
Place the assembled pie on a baking sheet lined with parchment paper to catch any drips. Bake for 50-55 minutes until the crust is deep golden brown and the filling is bubbling vigorously through the slits in the top crust. The filling should be thickened but still slightly jiggly in the center—it will set as it cools.
If the edges start browning too quickly, cover them loosely with aluminum foil. I press down gently on the pie dish during the first 20 minutes of baking—this prevents the crust from puffing up unevenly. The pie is done when it smells like warm cherries and cinnamon fills your kitchen. Let it cool completely before slicing, at least 2 hours—this gives the filling time to set properly.
🍽️ Step 5: Serve with Ice Cream
Once completely cooled, slice the pie into 8 equal wedges using a sharp pie server. Serve each slice warm with 2 scoops vanilla ice cream on the side. The contrast between the warm pie and cold ice cream creates the perfect balance of textures and temperatures.
Here's where it gets fun—toss in a pinch of extra cinnamon on top of the ice cream before serving. The aroma alone will have everyone gathering around your table. This pie keeps well in the refrigerator for up to 4 days, though I doubt it will last that long with fresh-baked appeal.
Pro Tips For Making American Cherry Pie
- Simmer Cherries Slow: Skip the rush—bring your cherries to a full boil first, then reduce to a gentle simmer for 10-12 minutes. This lets the sugar dissolve evenly and the flavors meld without turning the filling into glue. (Yes, even if you’re impatient like me.)
- Drain, Don’t Rinse: After pitting cherries, drain them in a colander but never rinse them. That washes away the natural juices and tightens the fruit, making your filling taste bland and watery. Pat them dry if they’re wet, but leave the flavor intact.
- Chill the Filling: Let your cherry filling cool completely before pouring it into the crust. I learned this the hard way—warm filling melts the butter in the crust faster than you can say "soggy bottom," and no one wants that. Pop it in the fridge for 20 minutes if you’re eager.
- Brush, Not Drown: For that golden crust, brush the top with egg wash lightly—just enough to coat, not drown. Too much liquid makes the crust steam instead of brown, and you’ll end up with a sad, pale lid. (Your future self will notice the difference.)
Common mistakes when making this recipe
Overfilling the Pie
One of the most common mistakes is overfilling the pie crust. When the filling exceeds the crust's capacity, it can cause a messy spillover during baking or even a blown crust. The filling should reach about ½ inch below the top edge of the crust.
If you're using a lattice top, leave even more room—about ¾ inch—to prevent steam buildup from pushing the crust upward. I've seen pies with filling so high that it oozed out the sides during baking, creating a sticky mess that's hard to clean up. 🍒
Skipping the Pre-Bake
Many bakers forget to pre-bake the bottom crust before adding the filling. This step is crucial for preventing a soggy bottom. I recommend baking the bottom crust for 10-15 minutes at 375°F before adding the filling.
This creates a barrier that keeps the crust crisp. If you skip this step, the filling's moisture will seep into the crust, making it doughy instead of flaky. Trust me, your guests will notice the difference.
Not Venting the Top Crust
If you're using a double-crust pie, failing to vent the top crust can lead to a blown crust or a pie that doesn't bake evenly. Cut a few small slits in the top crust or use a crimped edge with a lattice design to allow steam to escape.
I like to make 4-5 small cuts in a cross pattern or create a simple lattice with strips of dough. Without proper venting, the steam has nowhere to go, causing the crust to puff up and potentially crack. This also helps the filling cook evenly throughout.
Underestimating Chill Time
Rushing the dough out of the fridge without proper chilling is a recipe for disaster. The dough needs to rest for at least 1 hour (or up to 24 hours) to relax the gluten and develop flavor.
If you skip this step, the crust will shrink during baking, creating an uneven, misshapen pie. I've seen doughs that looked perfect when rolled out but turned into a sad, lopsided mess in the oven.
Patience is key—let the dough rest, and it will reward you with a beautiful, flaky crust. ⏰
Overmixing the Dough
Overmixing the pie dough can lead to a tough, dense crust instead of the light, flaky texture you want. Mix just until the dough comes together—no need to overwork it. I use a food processor and pulse the ingredients until they resemble coarse crumbs with pea-sized butter pieces.
Once the dough forms when pressed, stop mixing. Overmixing develops gluten, which makes the crust tough. The goal is to keep it tender and delicate, not chewy and dense.
Ignoring the Lemon Juice
Some bakers skip the lemon juice in the filling, thinking it's optional. But this brightens the cherries and balances their sweetness. Without it, the filling can taste flat or overly sweet.
I always use 2 tbsp fresh lemon juice—it enhances the natural tartness of the cherries and adds a fresh, citrusy note. If you're using very sweet cherries, you might even reduce the sugar slightly and rely more on the lemon juice for balance.
Don't skip this step—it makes a big difference in the final flavor. 🍋
Nutrition facts
Frequently asked questions
Can I use canned cherries instead of fresh or frozen?
Yes, but you'll need to adjust the recipe slightly. Drain and rinse canned cherries well to remove excess syrup, then use 3 cups instead of 4 cups fresh/frozen. Add 1 extra tablespoon of cornstarch to thicken the filling properly. The syrup can make the filling too runny if you use the same amount.
How do I make a lattice crust without special tools?
No fancy tools needed! Roll out the top crust, then cut 8-10 strips (about ½-inch wide) using a sharp knife. Weave them in an over-under pattern, starting with 3 strips across. Press gently to seal edges. For extra stability, brush strips with egg wash before baking. The classic crisscross pattern adds beauty while keeping the filling juicy.
Can I make this pie ahead of time?
Assemble the pie (unbaked) and refrigerate for up to 24 hours before baking. For best results, bake it 1 day ahead of serving—this lets flavors meld. Store the baked pie at room temperature in an airtight container for 2 days, or freeze for up to 3 months. Thaw overnight in the fridge before serving.
What's the best way to reheat leftover pie?
Warm slices at 350°F for 5-8 minutes until heated through. For a crispy crust, place slices on a baking sheet and cover loosely with foil. Microwaving works in a pinch (20-30 seconds), but it can make the crust soggy. The best method? Serve pie at room temperature with ice cream—no reheating needed!
Why does my crust turn out tough instead of flaky?
Overmixing or warm butter are the usual culprits. Keep butter cold and pulse just until dough forms. Chill dough for at least 1 hour before rolling. Also, avoid adding extra flour—it makes crust dense. For extra flakiness, freeze dough for 20 minutes before rolling out. The secret is gentle handling!