
Desserts
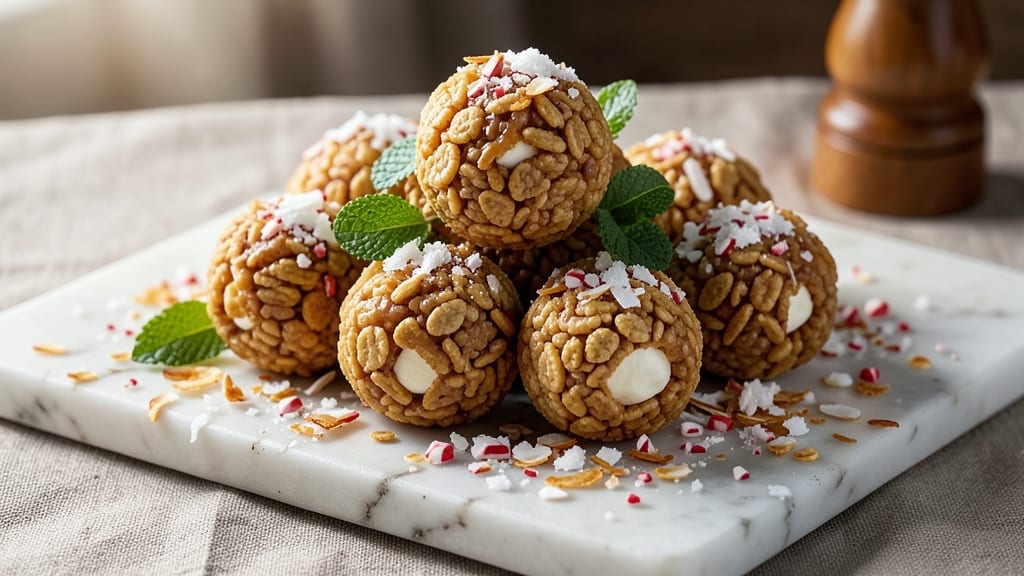
This Rice Krispie Snowballs recipe brings back childhood memories with every bite—crunchy clusters of Rice Krispies held together by gooey marshmallow rivers, all wrapped in buttery perfection. 💛 The magic happens when you melt marshmallows and butter just right, then fold in the cereal before shaping into easy-to-handle balls.
I’ve perfected this nostalgic treat over years of holiday baking, and it’s become a crowd-pleaser for parties, gifts, or after-dinner snacks.
The beauty of these snowballs lies in their simplicity: just three main ingredients—Rice Krispies, marshmallows, and butter—plus optional coatings like coconut, nuts, or melted chocolate for extra flair. No baking required, which makes them ideal for kids to help with (and eat!).
The texture is what makes them special: crispy on the outside, soft and marshmallow-rich inside, with that signature "snowball" shape that’s impossible to resist.
Once formed, these treats keep well in the fridge for up to a week, though they rarely last that long. Roll them in your favorite coating—crushed peppermint for holidays, toasted coconut for a tropical twist, or even sprinkles for playful fun.
They’re perfect for gifting, potlucks, or satisfying that late-night sweet tooth without turning on the oven.
What sets this recipe apart is how versatile it is. Stick to the classic version or get creative with flavors—add a dash of vanilla, cinnamon, or even a splash of citrus zest to the marshmallow mixture.
The possibilities are endless, but the foundation stays foolproof. Let’s get started on making these nostalgic treats!
Ingredients for rice krispie snowballs
Three core ingredients and endless creative possibilities for nostalgic holiday treats everyone will love.
| Ingredient | Amount | Notes |
|---|---|---|
| Rice Krispies Cereal 🍚 | 6 cups | Original flavor preferred |
| Large Marshmallows 🍬 | 10 oz | Mini marshmallows work too |
| Unsalted Butter 🧈 | ½ cup | Cold, cubed for easy melting |
| Vanilla Extract 🌿 | 1 tsp | Pure extract for best flavor |
| Toasted Coconut Flakes 🥥 | 1 cup | For classic coating |
| Crushed Peppermint Candy 🎄 | ½ cup | For holiday version |
| Melted Chocolate 🍫 | ½ cup | Dark or semi-sweet |
| Powdered Sugar 🍰 | ¼ cup | For dusting snowballs |
| Cinnamon 🌶️ | ½ tsp | Optional for flavor boost |
| Chopped Nuts 🌰 | ½ cup | Pecans or almonds work best |
| Lemon Zest 🍋 | 1 tsp | For citrusy twist |
The Rice Krispies are your canvas—original flavor is non-negotiable here, as it's the classic base. Trader Joe's and Kroger both carry the big 10.5 oz box, which gives you plenty for multiple batches. Marshmallows? Mini marshmallows work perfectly if you want smaller snowballs, but the classic 10 oz bags melt more dramatically. Butter quality matters—Plugrá or Land O'Lakes unsalted work best for that clean, rich flavor. Pro tip: keep your butter cold until you're ready to melt it—this prevents premature melting when you're mixing everything together.
No vanilla extract? Vanilla sugar at half the amount works in a pinch, but you'll lose that authentic flavor. Running low on coconut flakes? Crushed pretzels add a salty crunch, or freeze-dried fruit gives a fruity twist. For the chocolate coating, Ghirardelli dark chocolate squares melt beautifully—just chop them yourself for smoother results. Want extra flair? Mix in a dash of cinnamon with the marshmallow mixture for warmth, or a pinch of cayenne for a spicy kick (trust me, it's delicious). The lemon zest adds brightness—use a microplane for fine, fragrant strips.
These snowballs keep beautifully in the fridge for up to 1 week, though they rarely last that long. Store them in an airtight container between layers of parchment paper to prevent sticking. For longer storage, freeze them for up to 3 months—just thaw at room temperature before serving. The key to reheating is a quick 10-second zap in the microwave to revive the marshmallow gooeyness. I always make a double batch: one for immediate snacking and one to gift in cute little jars tied with ribbon—instant party favors!
Why You'll Love This Recipe
- Zero-Fuss Magic: I swear, this takes less effort than microwaving leftovers. Melt butter, mix in marshmallows and cereal—boom. No fancy tools, no waiting around. Honestly, my kids think I’m a genius, and they’re not wrong.
- Coconut-Vanilla Hug: That toasted coconut and vanilla extract combo? It’s like a warm, buttery hug in every bite. The marshmallows stay gooey, the cereal stays crisp, and the coconut adds this unexpected crunch that makes it taste like a dessert you’d pay for at a café—not something you made in 10 minutes.
- Party in a Jar: Seriously, these are my secret weapon for holidays, potlucks, or even just a lazy Sunday. Roll them into snowballs, dump them in a jar, and watch them disappear. I’ve used them as edible ornaments for Christmas, snacks for book club, and even packed them in lunches—because why not?
- Pantry Superstar: Between us, this recipe is the definition of budget-friendly. You’re using stuff you already have—no special trips to the store. And the leftovers? They last forever if you store them right. I’ve had them sit in the fridge for a week, and they’re still just as good. (Yes, even on a Tuesday night.)
Step-by-step instructions for crunchy rice krispie snowballs
Here's how to make these nostalgic treats with perfect texture and flavor balance.
🍳 Step 1: Melt Butter and Marshmallows Together
In a large, heavy-bottomed saucepan, combine the 0.5 cup unsalted butter and 10 oz large marshmallows. Place the pan over medium-low heat and stir constantly with a wooden spoon or silicone spatula. You want to see the butter melt completely before the marshmallows start to soften.
Once the butter is fully melted, the marshmallows will begin to dissolve and turn into a smooth, glossy mixture. This should take about 5-7 minutes. Watch closely—the moment it turns completely liquid and glossy is your cue to remove it from heat. If it starts to brown, you've gone too far, and the flavor will turn bitter.
👨🍳 Step 2: Stir in Vanilla and Chocolate
Immediately after removing the pan from heat, stir in the 1 tsp vanilla extract and 0.5 cup melted chocolate. The chocolate will thicken the mixture slightly, creating that perfect binding agent for the snowballs. Mix until the chocolate is completely incorporated and the mixture is smooth and homogeneous.
Here's the thing—this mixture needs to be hot enough to melt the chocolate completely but not so hot that it burns the vanilla. If you notice any graininess, return the pan to low heat for just 10 seconds to fully melt the chocolate, then remove again. The mixture should be thick but still pourable at this stage.
🥘 Step 3: Fold in Rice Krispies and Cool Slightly
Transfer the marshmallow mixture to a large mixing bowl. Using a silicone spatula, gently fold in the 6 cups Rice Krispies Cereal until evenly distributed. Be careful not to overmix—just combine until all the cereal is coated. The mixture will still be quite warm at this point.
Let the mixture cool for about 5 minutes while you prepare your work surface. You want it cool enough to handle but still slightly sticky. If it cools too much, you can warm it briefly in the microwave for 10 seconds to make it more pliable. This cooling step is crucial for shaping perfect snowballs that hold together.
👨🍳 Step 4: Shape and Coat the Snowballs
Once the mixture is cool enough to handle, wet your hands with cold water and gently form the mixture into 1-inch diameter balls. I like to make them slightly larger than needed because they'll shrink as they cool. Place them on a parchment-lined baking sheet.
In a shallow bowl, combine the 1 cup toasted coconut flakes, 0.5 cup chopped nuts, 0.5 cup crushed peppermint candy, 0.25 cup powdered sugar, 0.5 tsp cinnamon, and 1 tsp lemon zest. Roll each snowball in this mixture until fully coated, pressing gently to adhere. This coating gives you that perfect crunchy exterior with bursts of flavor in every bite.
⏰ Step 5: Chill and Serve
Place the coated snowballs on the baking sheet and refrigerate for at least 1 hour to firm up. This chilling time is essential—it allows the marshmallow center to set properly and prevents the snowballs from getting sticky. For best results, chill them overnight if you can.
Once chilled, they'll have that perfect texture: a crispy, flavorful exterior with a warm, gooey marshmallow center that melts in your mouth. Serve them at room temperature for the ultimate nostalgic treat experience. These snowballs keep well in an airtight container in the fridge for up to 1 week, though they rarely last that long in my house!
Pro Tips For Making Rice Krispie Snowballs
- MELT MARSHMALLOWS LOW AND SLOW: I learned this the hard way—blasting them on high turns them rubbery fast. Use medium-low heat and stir constantly, breaking them into chunks with a wooden spoon. You want them gooey, not gloppy or burnt.
- CHILL THE MIX BEFORE ROLLING: This isn’t optional. Let the cereal-marshmallow-butter combo sit for 10 minutes after mixing—it firms up enough to hold shape without sticking to your hands. (Yes, even if you’re impatient like me.)
- TOAST COCONUT UNTIL GOLDEN: Plain coconut flakes? Skip it. Toast them in a dry pan over medium heat for 3-4 minutes until they smell nutty and turn golden. The extra effort makes the flavor pop—no one wants bland snowballs.
- PRESS SNOWBALLS FIRMLY: Don’t half-ass the rolling. Pack each ball tightly in your palm—this keeps them from crumbling when you dip them in coconut. Think "snowball," not "pancake crumbs."
Make-ahead tips for this recipe
Prep Ahead
Make these snowballs 2-3 days in advance—the flavors deepen as they sit! I always prep a batch on Sunday for holiday parties. Store them in an airtight container between layers of parchment paper to prevent sticking. The longer they chill, the more perfect the texture becomes. 💫
Freezer-Friendly
Freeze uncoated snowballs for up to 3 months by placing them on a tray first, then transferring to a freezer bag. Thaw at room temperature for 30-60 minutes before coating. Pro tip: Use a microwave-safe plate for 10-second intervals to speed up thawing while keeping the marshmallow center intact.
Coating Prep
Toast your coconut flakes in a dry pan over low heat for 2-3 minutes until golden—this adds depth of flavor. Chop nuts finely for even coating.
For peppermint, crush candy with a rolling pin or pulse in a food processor. Pre-mix all coatings in separate bowls for quick rolling later. 🥥
Kid-Friendly Assembly
Let kids help with the fun part! After shaping the snowballs, set out small bowls of different coatings (like sprinkles or crushed cereal) and let them decorate their own. This makes it a perfect after-school activity. Just supervise the chocolate coating step—it needs adult attention to handle properly.
Gift-Worthy Packaging
Package snowballs in clear cellophane bags tied with ribbon for instant party favors. Add a handwritten tag with the recipe or holiday message. Store in the fridge until ready to give—no thawing needed! These make beautiful gifts for teachers, neighbors, or holiday exchanges. 🎄
Nutrition facts
Frequently asked questions
Can I make these without butter?
Yes, you can substitute butter with vegetable shortening or coconut oil for a dairy-free version. Use the same amount (0.5 cup) and follow the same melting process. The texture will be slightly different but still delicious. For a vegan option, ensure your marshmallows are also plant-based.
Why are my snowballs crumbling apart?
Crumbling usually happens when the marshmallow mixture cools too much before shaping. Keep the mixture warm but not hot while working. If it gets too firm, microwave it for 10 seconds to soften. Also, ensure you're rolling them in enough coating to create a protective barrier.
What's the best way to store them for holidays?
Store them in an airtight container between layers of parchment paper to prevent sticking. They'll keep fresh in the fridge for up to 1 week or in the freezer for 3 months. For gifting, package individual snowballs in clear cellophane bags tied with ribbon—no thawing needed before serving!
Can I use mini marshmallows instead of large?
Mini marshmallows will create smaller snowballs but work perfectly. Use about 15 oz of mini marshmallows to match the volume of 10 oz large marshmallows. The texture will be slightly different but still delicious. This is great for making bite-sized treats for kids' parties.
How can I make them gluten-free?
Use a gluten-free Rice Krispies cereal alternative like gluten-free corn flakes or puffed rice cereal. Check labels to ensure no cross-contamination with wheat. The rest of the recipe remains the same. For extra security, make sure all your coatings (like coconut or nuts) are also certified gluten-free.