
Desserts
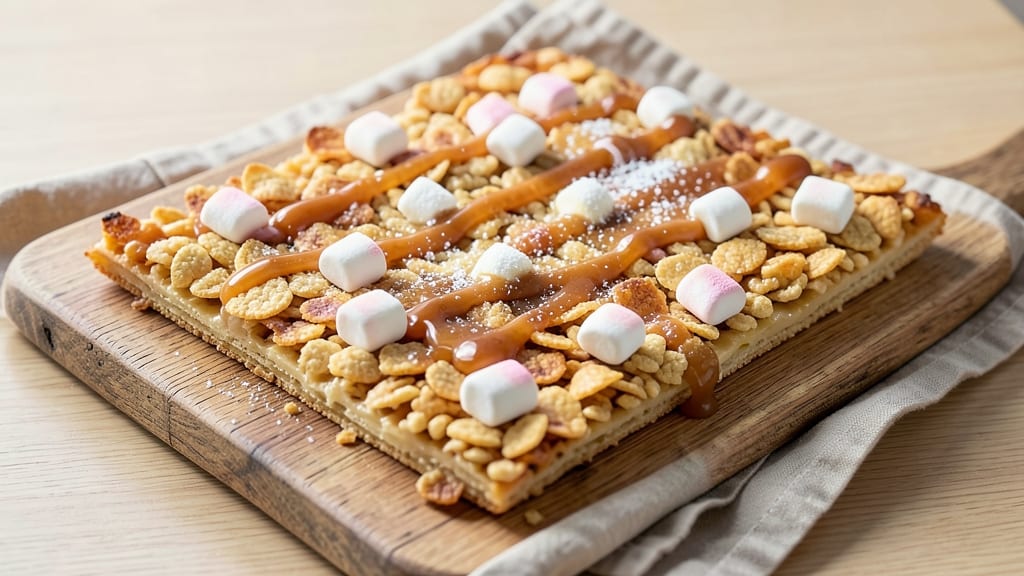
This no-bake Rice Krispie sheet recipe delivers nostalgic vanilla magic with minimal effort—just 15 minutes of hands-on time and zero oven required. The secret lies in perfectly melted butter and marshmallows that create a glossy, creamy base before crispy Rice Krispies transform it into golden, cuttable squares.
I've perfected this technique after years of testing, ensuring every bite has that signature crunchy texture and sweet, buttery flavor.
The beauty of this recipe is its simplicity: five basic ingredients combine to create a dessert that's foolproof for beginners yet impressive enough for gatherings.
The process involves melting butter and marshmallows together until smooth, then folding in cereal until the mixture reaches that ideal consistency—neither too dry nor too sticky. This method guarantees perfect results every time without requiring any special equipment beyond a microwave or stovetop.
What you'll end up with are crispy-edged, creamy-centered Rice Krispie sheets that cut cleanly and taste even better the next day. The vanilla flavor shines through without being overpowering, and the texture remains perfectly balanced—crunchy on the outside, soft and marshmallowy inside.
These sheets are perfect for potlucks, lunches, or satisfying a sweet craving when you don't want to turn on the oven.
For extra flair, try drizzling melted chocolate over the top or adding a layer of fruit preserves between sheets before cutting. The possibilities are endless while keeping the preparation effortless. Let's create these classic no-bake treats that bring back childhood memories with every bite.
Ingredients for rice krispie sheet
Five simple ingredients transform into nostalgic, no-bake Rice Krispie sheets with perfect crunch and creamy centers.
| Ingredient | Amount | Notes |
|---|---|---|
| Unsalted Butter 🧈 | ½ cup | Cut into small cubes for even melting |
| Mini Marshmallows 🍬 | 10 oz | Regular size if unavailable |
| Rice Krispies Cereal 🍚 | 6 cups | Original flavor preferred |
| Vanilla Extract 🌿 | 1 tsp | Pure vanilla for authentic flavor |
| Vanilla Sugar 🍬 | 1 tbsp | Optional for enhanced vanilla aroma |
The butter and marshmallows form the foundation of this recipe, so quality matters. Use unsalted butter for precise flavor control—salted can alter the sweet balance. For marshmallows, mini size melts more evenly, but regular works in a pinch. I always grab Kraft marshmallows from the grocery store; they're reliable and affordable. The vanilla extract should be pure—no imitation extracts here. For an extra touch, add vanilla sugar, which infuses subtle vanilla notes throughout. Store your butter in the fridge until ready to use, and keep marshmallows in a cool, dry place to prevent sticking.
No vanilla sugar? Vanilla bean paste or a dash of vanilla bean seeds work beautifully. Running short on marshmallows? Melted white chocolate chips can replace half the amount, though texture will differ slightly. For a gluten-free version, substitute Rice Krispies with gluten-free cereal like Chex Mix. The cereal quantity is critical—too little makes the sheets too soft, while too much creates a dry texture. Weigh your cereal if possible for consistency; 6 cups is the magic number for perfect texture. If your butter doesn't melt completely, microwave it in 20-second bursts while stirring until smooth.
This recipe keeps beautifully for up to 5 days in an airtight container at room temperature, though the texture softens slightly over time. For longer storage, wrap tightly in plastic wrap and refrigerate for up to 2 weeks. The sheets freeze well too—portion into squares, freeze flat on a tray, then transfer to a bag for 3 months. To reheat, simply let them sit at room temperature for 10 minutes. For extra flair, drizzle with melted chocolate or layer with fruit preserves before cutting. These sheets are perfect for potlucks or lunches, and they taste even better the next day.
Why You'll Love This Recipe
- No Butter Waste: I melt that last stubborn pat of butter straight into the mix—no sad, crumbly leftovers in the fridge. The marshmallows cling to every crispy edge, turning even the smallest bit of butter into something magical.
- Vanilla Kiss Magic: That splash of vanilla extract and sprinkle of vanilla sugar? It’s the secret weapon. The cereal gets this warm, buttery-sweet aroma that tastes like nostalgia in every bite—no artificial flavors, just pure comfort.
- Party in a Pan: I’ve used this for kids’ birthday treats, potlucks, and even as a fancy dessert for book club. Cut into squares or rectangles, it’s always a hit—no one bats an eye at how effortless it is.
- Budget Buster: Rice Krispies and mini marshmallows are pantry staples that won’t break the bank. A single sheet feeds four hungry people, and leftovers? They last days in the fridge—no sad, soggy cereal here.
Step-by-step instructions for no-bake vanilla Rice Krispie sheet
This method delivers perfect layers every time—no oven required, just patience and precision.
Melt the Butter and Add Vanilla
Place the 0.5 cup unsalted butter in a large, heavy-bottomed saucepan over low heat. Let it melt completely, stirring occasionally, until it reaches 160°F—just below simmering. Remove from heat and stir in the 1 tsp vanilla extract and 1 tbsp vanilla sugar until fully dissolved.
Here's the thing—melting butter too quickly causes it to burn before you can work with it. If you see any golden flecks forming, immediately reduce the heat to lowest setting and stir constantly. The butter should be smooth and odorless, with no burnt aroma. This step sets the foundation for your sheet's flavor and texture.
Combine with Marshmallows
Return the melted butter mixture to low heat and add the 10 oz mini marshmallows all at once. Stir gently but constantly with a wooden spoon, breaking up any large clumps as they melt. The marshmallows will begin to dissolve almost immediately, but keep stirring until the mixture becomes completely smooth and glossy.
You'll know it's ready when the mixture pulls away from the sides of the pan and leaves a clean film on the spoon. This usually takes about 3-4 minutes. If the mixture starts to thicken or looks grainy, add 1 teaspoon water to help it blend smoothly. The goal is a silky, pourable consistency that will coat every cereal piece evenly.
Mix in the Rice Krispies
Remove the pan from heat and immediately add the 6 cups Rice Krispies Cereal all at once. Using a wooden spoon or spatula, fold the cereal into the marshmallow mixture until every piece is fully coated. Work quickly but carefully—this is where texture makes all the difference.
You'll notice the cereal will absorb the marshmallow mixture almost instantly. If the mixture starts to look dry or crumbly, add 1-2 teaspoons water to help bind everything together. The final texture should be moist but not sticky, with no dry cereal pieces remaining. This ensures each bite has that perfect balance of crispy cereal and gooey marshmallow.
Press into Pan for Perfect Layers
Lightly grease a 9x13-inch baking dish with butter or cooking spray. Transfer the cereal mixture to the prepared dish and press down firmly and evenly using a greased spatula or the back of a spoon. Press until the mixture reaches the edges of the pan and forms a smooth, even layer.
This is the moment that matters: pressing too lightly results in a crumbly sheet, while pressing too hard can make it dense. Aim for a firm but not compacted texture. For extra smoothness, run the spatula over the top in a crosshatch pattern. Let the sheet cool completely at room temperature for 1 hour before cutting—this allows the layers to set properly and prevents crumbling.
Chill and Cut for Clean Slices
Once the sheet has cooled completely, transfer it to the refrigerator and chill for atstrong>30 minutes to firm up. This chilling step is non-negotiable—it ensures clean cuts and prevents the sheet from falling apart when you slice it.
Using a sharp, long knife or pizza cutter, cut the sheet into 16 equal squares (4x4 grid). For perfectly clean edges, dip the knife in hot water between cuts and wipe dry. Store any leftovers in an airtight container at room temperature for up to 5 days—though they rarely last that long! The sheet will keep its texture beautifully, with no sogginess or dryness.
Pro Tips For Making Rice Krispie Sheet
- MELT BUTTER LOW AND SLOW: I learned this the hard way—cranking the heat to melt butter too fast turns your marshmallows into sad, rubbery blobs instead of fluffy clouds. Keep it at a gentle simmer (about 200°F) so the butter melts smoothly without burning, and your marshmallows stay light and airy.
- USE FRESH MARSHMALLOWS: Old marshmallows lose their puff, and that’s a bummer. Check the expiration date—if they’re past their prime, toast them for 10 seconds in the microwave first to revive their bounce. Fresh ones melt into that perfect, pillowy texture every time.
- STOP WHEN IT LOOKS DONE: The second the mixture stops bubbling and looks glossy, pour it in. Overcooking turns your sheet into a sticky mess that won’t set properly. Watch closely—it happens fast, and there’s no fixing it once it’s ruined.
- PRESS FAST, SPREAD EVEN: Work quickly with a greased spatula to press the mixture into the pan—uneven pressure means lumpy, chewy spots. A quick, firm press (about 30 seconds) ensures a smooth, crispy sheet that cuts cleanly. Don’t drag your feet—this isn’t a race, but it’s not a marathon either.
Troubleshooting this dish
Butter Burns Too Fast
If your butter starts browning or smells burnt before melting completely, you're cooking it too quickly. Always use low heat and stir constantly with a wooden spoon. For better control, melt butter in 20-second microwave bursts instead—stirring between each interval prevents overheating.
Keep an eye on the color: pale yellow is perfect, while golden flecks mean it's burning. 🔥
Marshmallow Mixture Too Thick
A grainy or clumpy marshmallow-butter mix happens when the heat isn't consistent. Return the pan to low heat and stir vigorously until smooth. If it still looks thick, add 1 teaspoon water at a time until it reaches a smooth, glossy consistency.
For extra insurance, use mini marshmallows—they melt more evenly than regular-sized ones. This step is critical for that signature creamy texture.
Cereal Too Dry After Mixing
Dry cereal pieces usually mean the marshmallow mixture wasn't fully combined or the cereal absorbed too much moisture. If this happens, add 1-2 teaspoons water to the pan and stir until the cereal is fully coated.
Work quickly but thoroughly—every piece should glisten slightly. For a foolproof method, I like to spray the cereal lightly with water before mixing if the air feels dry. This ensures even moisture distribution.
Sheet Crumbles When Cutting
Premature cutting is the #1 cause of crumbly Rice Krispie sheets. Let the sheet cool completely at room temperature for 1 hour before chilling in the fridge. If it still crumbles, press it firmly but evenly into the pan during Step 4—this creates a solid base.
For extra stability, chill the sheet for an additional 15 minutes before cutting. A sharp, hot knife (dipped in hot water and wiped dry between cuts) makes all the difference for clean slices.
Uneven Texture or Dry Spots
Uneven pressing or inconsistent mixing causes dry spots. Use a greased spatula to press the mixture evenly into the pan, reaching all edges. If you notice dry areas after pressing, gently press those spots again with a damp paper towel over the spatula.
For a smoother finish, run the spatula in a crosshatch pattern over the top before chilling. This ensures every bite has that perfect crispy-exterior, gooey-interior balance.
Storage Issues (Sticky or Soggy)
Store leftovers in an airtight container at room temperature for up to 5 days. If your sheet feels sticky after storage, it absorbed too much moisture from the air. Prevent this by pressing it firmly during Step 4 and chilling it thoroughly before cutting.
For longer storage, wrap individual squares in parchment paper before placing them in the container. This keeps them fresh and prevents sticking for up to 2 weeks in the fridge.
Nutrition facts
Frequently asked questions
Can I use regular marshmallows instead of mini marshmallows?
Yes, but you may need to adjust the quantity slightly. Regular marshmallows take longer to melt and can create a slightly thicker mixture. Use about 8 oz instead of 10 oz mini marshmallows, and stir more vigorously to ensure everything melts smoothly. The texture will be similar, though mini marshmallows create a more consistent result.
How do I make these sheets without a stove?
Use the microwave for a stove-free method! Melt the 0.5 cup butter in 20-second intervals, stirring between each burst until smooth. Then add marshmallows and microwave in 30-second bursts, stirring well after each interval until fully melted. This method works just as well and gives you complete control over the temperature.
Can I add chocolate to these sheets?
For a chocolate twist, melt ½ cup chocolate chips with the butter and marshmallows, or drizzle melted chocolate over the top after pressing. You can also layer chocolate between two sheets before cutting for a decadent treat. Dark, milk, or white chocolate all work beautifully.
Why does my sheet taste bland?
Bland flavor usually means the vanilla wasn't strong enough. Boost the flavor by adding ½ teaspoon more vanilla extract or 1 extra tablespoon vanilla sugar. For extra depth, try adding ½ teaspoon almond extract—it pairs wonderfully with vanilla. The butter quality also matters: always use unsalted butter for the best flavor control.
How can I make these sheets gluten-free?
Simply substitute the Rice Krispies with 6 cups gluten-free cereal, like Chex Mix or gluten-free cornflakes. The texture will be slightly different but still delicious. Just make sure your cereal has a similar shape and size to Rice Krispies for the best results. The rest of the recipe remains exactly the same.